Beat Ame-no-Murakumo (NG)
Timer starts on selecting New Game on title screen
Timer ends on fade to black after Murakumo fight battle results screen
Quick Links
- Grass Stratum (1F ~ 3F)
- Ocean Stratum (4F ~ 6F)
- Jungle Stratum (7F ~ 9F)
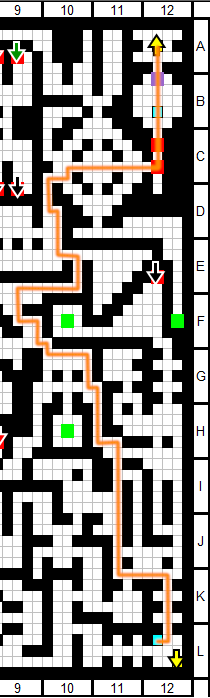
- Desert Stratum (10F ~ 12F)
- Fire Stratum (13F ~ 15F)
- Dark Stratum (16F ~ 18F)
- Heaven Stratum (19F ~ 20F)
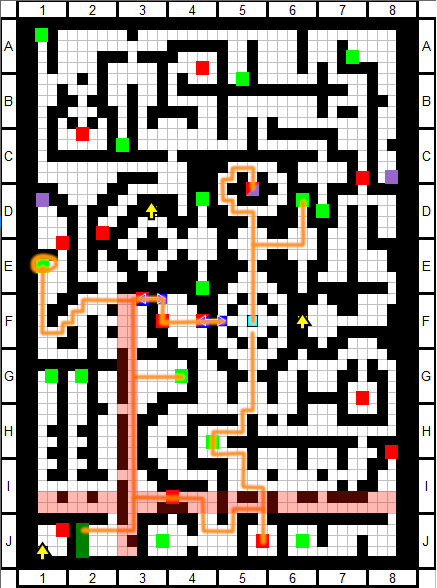
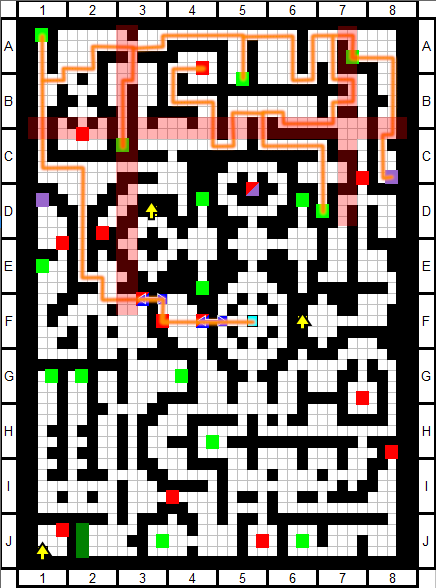
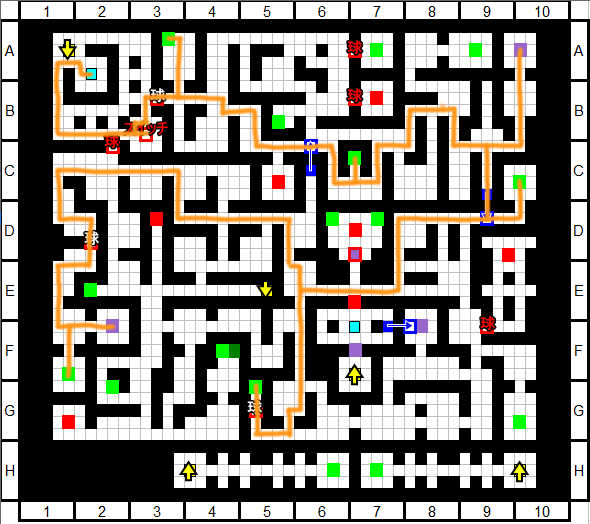
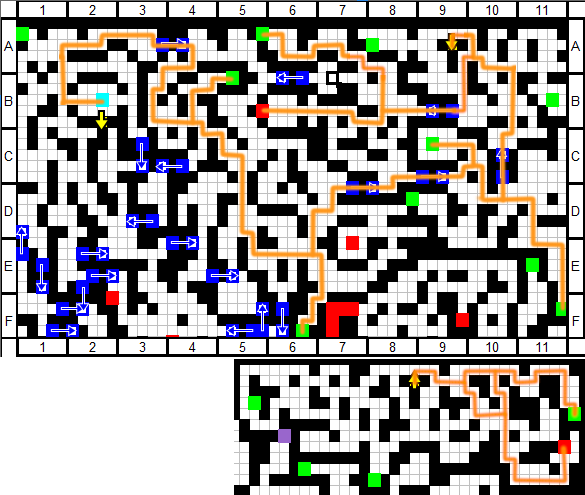
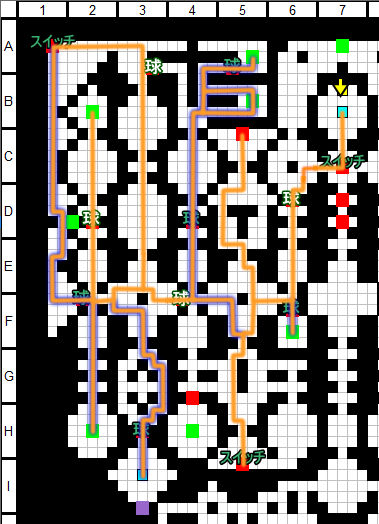
Grass Stratum (1F ~ 3F)
Explore 1F
- Start the game and hold Z to skip text, say no to NG+ and Hard mode
- Go into Akyuu’s house to get Treasure Chest Key x1
- Open the menu and take the following actions:
- Form Change: Kourin / Keine / Reimu / Marisa
- Learn Skills:
- Kourin: Shopkeeper 0 -> 3
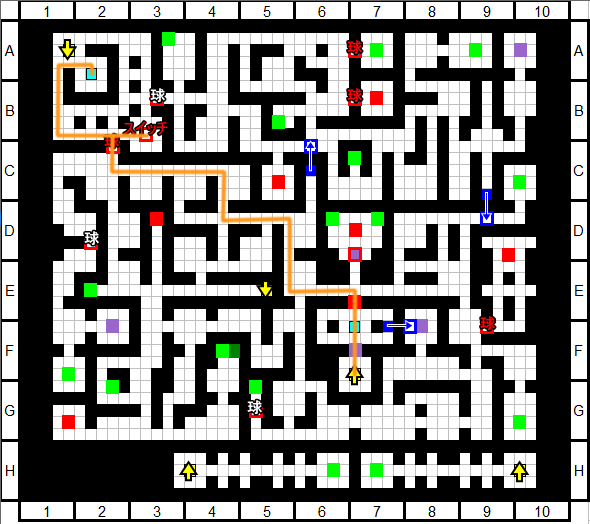
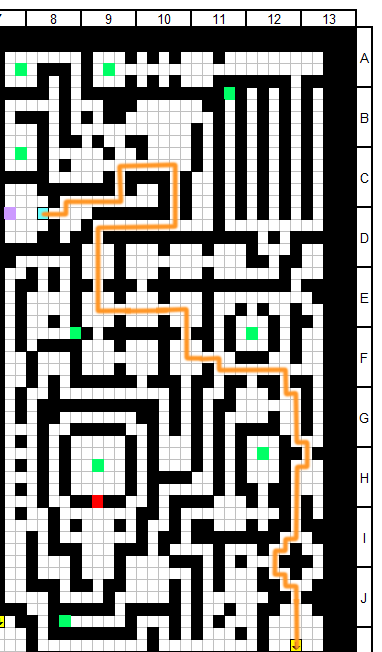
- Enter the dungeon (1F)
- Right after you open the locked treasure chest, do this menu:
- Keine:
- (1) Life Fragment (1)
- (2) Purple Metallic Armor (1)
- Reimu:
- (2) Biggest Sword Ever (1)
- (1) Symbol of Faith (1)
- Marisa:
- (1) Mana Flower (1)
- Keine:
- Once you reach the destination on the map, farm until wipe
- Back to Gensokyo, use these facilities:
- Hakurei Shrine: Level All Characters
- Human Village: Include Momiji in party (slot 5)
- Open the menu and take the following actions:
- Form Change: Momiji / Keine / Reimu / Marisa
- Equipment:
- Keine:
- (1, 2) Remove
- Momiji:
- (2) Life Fragment (1)
- (1) Purple Metallic Armor (1)
- Marisa:
- (M) Cypress Stick (1)
- Keine:
- Learn Skills:
- Keine: MP Boost 0 -> 2
- Marisa: MP Boost 0 -> 2
- Kourin: Shopkeeper 3 -> 4
- Level reference: Reimu 2
- Enter the dungeon (1F)
- When you reach the destination, farm until wipe
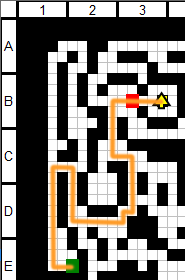
Youmu Fight
- Do the following menu after re-entering the dungeon:
- Form Change: Marisa
- Move up towards Youmu fight and wipe 11/12 times to get Kasen
- Back at Gensokyo, visit the following facilities:
- Hakurei Shrine: Level All Characters
- Human Village: Include Kasen in party (slot 6)
- Open the menu and take the following actions:
- Form Change: Momiji / Kasen / Keine / Reimu
- Equipment:
- Reimu:
- (2) Remove
- Marisa:
- (2) Light Staff (1) (if dropped)
- (M) Remove
- Kasen:
- (M) Cypress Stick (3)
- (3) Bulletproof Armor (1)
- (2) Biggest Sword Ever (1)
- (1) Bludgeon (3)
- Reimu:
- Learn Skills:
- Momiji: Ability to See Far Distances 0 -> 1
- Reimu: Yin-Yang Orb 1 -> 2
- Kourin: Shopkeeper 4 -> 5
- Level reference: Reimu 3
- Enter the dungeon (1F)
- Move up to Youmu’s boss icon and fight her
- Boss Fight - Youmu Konpaku (Lv5)
- Higekiri’s Cursed Arm
- Momiji attack
- 3ST - Sword
- Great Hakurei Barrier
- Switch Reimu -> Marisa
- Spam attacks (Higekiri, Missile, Bite) and buffs (3ST Sword)
- For finer details see Youmu’s Boss Info
- Exit the dungeon when you beat Youmu
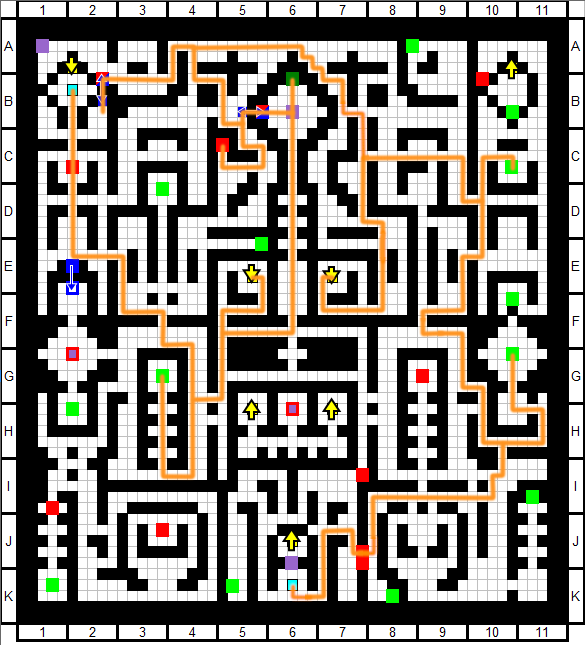
Explore 2F (Part 1)
- Back at Gensokyo, visit the following facilities:
- Hakurei Shrine: Level All Characters, apply bonus
- Reimu, Marisa MAG
- Kourin, Keine, Momiji HP
- Youmu, Kasen ATK
- Human Village: Include Youmu in party (slot 9)
- Nitori Shop: Buy 2 Manga Meat
- Hakurei Shrine: Level All Characters, apply bonus
- Open the menu and take the following actions:
- Form Change: Momiji / Keine / Reimu / Marisa
- Equipment (only if Youmu drop):
- Reimu:
- (2) Uniform of Exorcism (3)
- Reimu:
- Learn Skills:
- Kourin: Shopkeeper 5 -> 6
- Kasen: Guts 0 -> 1
- Youmu: Netherworld Dweller 0 -> 1
- Level reference: Reimu 4
- Enter the dungeon (1F)

- When you reach the destination, farm until wipe
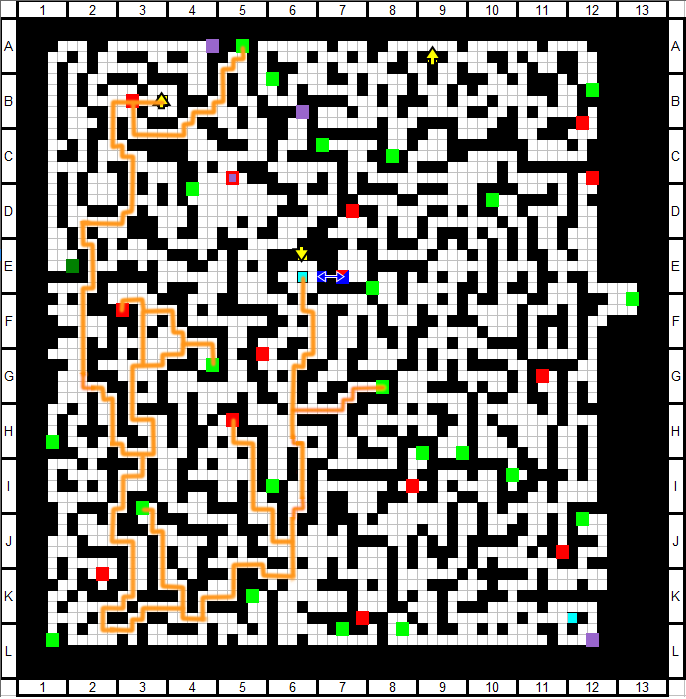
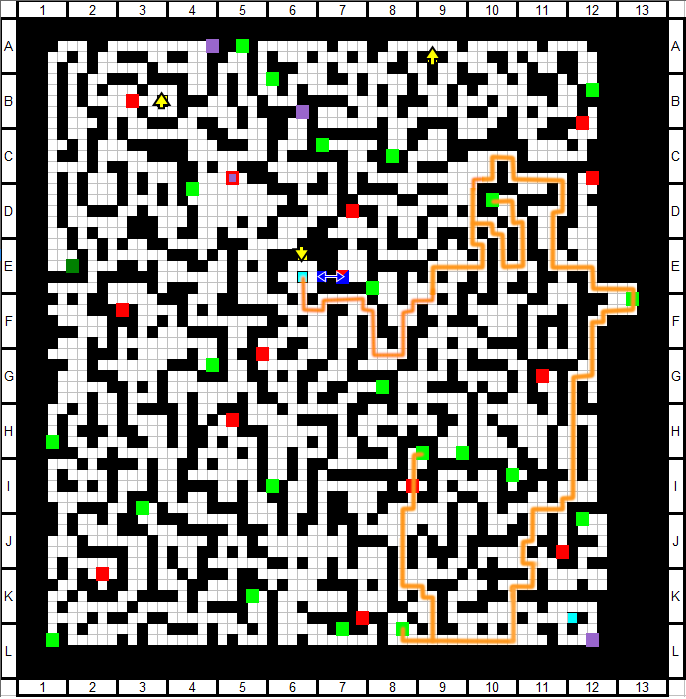
Chrysomallos Fight
- Back at Gensokyo, visit the following facilities:
- Hakurei Shrine: Level All Characters, apply new bonus
- Rumia MAG
- Cirno ATK
- Human Village: Include Rumia and Cirno in party (slots 7 and 8)
- Nitori Shop: Buy 1 Cypress Stick
- Hakurei Shrine: Level All Characters, apply new bonus
- Open the menu and take the following actions:
- Form Change: Momiji / Kasen / Keine / Reimu
- Equipment:
- Marisa:
- (M) Cypress Stick (1)
- Kasen:
- (3) Bludgeon (3) (if dropped)
- Marisa:
- Learn Skills:
- Kourin: Shopkeeper 6 -> 7
- Rumia: Piercing Attack 0 -> 1
- Cirno: Icicle Fall 1 -> 2
- Level reference: Reimu 6
- Enter the dungeon (2F)
- FOE Boss Fight - Chrysomallos (Lv9)
- Momiji waits for Reimu
- Higekiri’s Cursed Arm
- 3ST - Sword
- Great Hakurei Barrier
- Swap Reimu -> Marisa
- Spam attacks and Keine buffs
- Marisa: Buff x2 -> Focus -> Master Spark (Missile if TRR)
- Kasen: Higekiri’s Cursed Arm
- Reimu: Fantasy Seal
- Rumia: Moonlight Ray
- For finer details see Chrysomallos’ Boss Info
- Keep going up and take both treasures in 1F, then exit the dungeon
Explore 2F (Part 2)
- Back at Gensokyo, visit the following facilities:
- Hakurei Shrine: Level All Characters
- Open the menu and take the following actions:
- Form Change: Momiji / Kasen / Reimu / Marisa
- Equipment:
- Reimu:
- (3) DX Mecha Model (1)
- Reimu:
- Learn Skills:
- Kourin: Shopkeeper 7 -> 8
- Level reference: Reimu 6
- Enter the dungeon (2F)
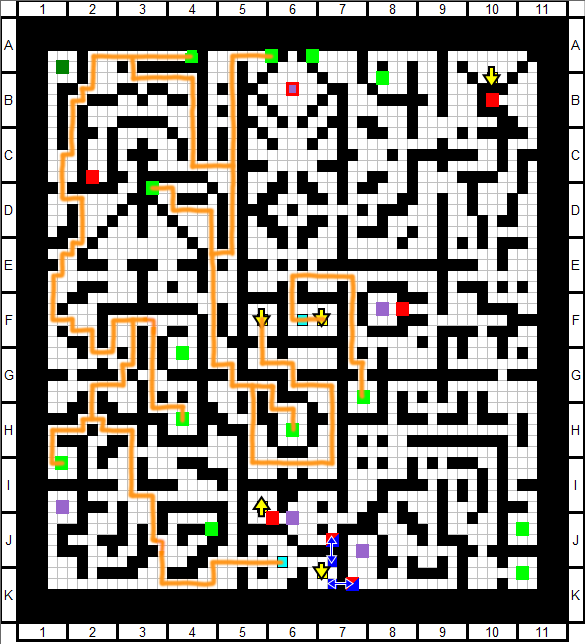
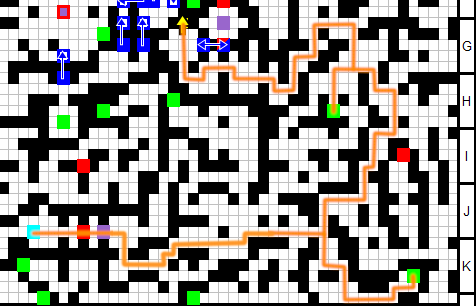
- When you reach 3F, take the relay point and farm on rare spot until wipe
- When you’re done grinding, go back to Gensokyo
Explore 3F
- Back at Gensokyo, visit the following facilities:
- Hakurei Shrine: Level All Characters, apply all bonuses
- Nitori Shop: Buy 1 Cypress Stick
- Open the menu and take the following actions:
- Equipment:
- Momiji:
- (M) Cypress Stick (1)
- (3) Sirloin (3)
- Kasen:
- (if no Bludgeon) (3) Bludgeon (3)
- Reimu:
- (if no Exorcism) (2) Light Crystal (3)
- Momiji:
- Learn Skills:
- Kourin: Shopkeeper 8 -> 9
- Cirno: Icicle Fall 2 -> 3
- Equipment:
- Level reference: Reimu 7
- Enter the dungeon (3F)
- Exit the dungeon back to Gensokyo
Alaya-Vijnana Fight
- Back at Gensokyo, visit the following facilities:
- Hakurei Shrine: Level All Characters, apply new bonus
- Minoriko MAG
- Magic Library:
- Reset Keine
- Human Village: Include Minoriko in party (slot 10)
- Hakurei Shrine: Level All Characters, apply new bonus
- Open the menu and take the following actions:
- Equipment:
- Marisa:
- (3) Glow Crystal (3)
- Marisa:
- Learn Skills:
- Kourin: Shopkeeper 9 -> 10
- Keine: Historian’s School 0 -> 1
- Rumia: Piercing Attack 1 -> 2
- Equipment:
- Level reference: Reimu 8
- Enter the dungeon (3F)
- Before entering the fight with Alaya-Vijana, do the following menu:
- Form Change: Momiji / Kasen
- Boss Fight - Alaya-Vijnana (Lv11)
- Yukari spams Shikigami: Ran Yakumo+
- Yuyuko uses Ghostly Butterfly -> Attack -> Saigyouji Flawless Nirvana
- Exit the dungeon back to Gensokyo
Komachi Fight
- Back at Gensokyo, visit the following facilities:
- Hakurei Shrine: Level All Characters
- Nitori Shop:
- Forge whatever you can, a general guide:
- Ephemeral Bauble x1 guaranteed
- Crepe Mariette x1 guaranteed
- Book of Stamp Bingo if dropped Chitin Shell
- Count how many forges you have, need 10 total on next trip
- Forge whatever you can, a general guide:
- Level reference: Reimu 9
- Enter the dungeon (3F)
- When you reach the relay point, farm 60 battles in 1F’s rare spot
- Prolong grind if you don’t have materials for 10 total crafts
- Back at Gensokyo, visit the facilities:
- Nitori Shop:
- Forge until you recruit Nitori
- Human Village: Include Nitori in party (slot 11)
- Magic Library:
- Reset Kourin, Keine
- Reimu: HP/DEF/MND 0 -> 10
- Momiji: HP/DEF 0 -> 20
- Nitori: ATK 0 -> 40
- Kasen: HP/DEF/MND 0 -> 10 / ATK -> 20
- Hakurei Shrine: Level All Characters, apply all bonuses
- Nitori ATK
- Use Training Manual x3 on Nitori
- Nitori Shop:
- Open the menu and take the following actions:
- Form Change: Momiji / Keine / Reimu / Nitori
- Equipment:
- Marisa:
- (M) Remove
- Momiji:
- (M) Remove
- (3) Life Fragment (1)
- (2) Courtesan’s Sorrow (3)
- Keine:
- (1) Heater Muffler (2)
- (2) Gokiri’s Charm (2)
- (3) Lucky Horseshoe (2)
- Reimu:
- (3) Super-Hard Rye Bread (3)
- (M) Cypress Stick (1)
- Nitori:
- (M) Cypress Stick (1)
- (1) DX Mecha Model (1)
- (2) (if dropped) Super-Hard Rye Bread (3)
- (2) Bracer of Power (1)
- (3) Wash Basin Set (5)
- Kourin:
- (3) Sirloin (3)
- Youmu:
- (3) Bulletproof Armor (1)
- (2) Life Fragment (1)
- (1) Life Fragment (1)
- Minoriko:
- (1) Mana Flower (1)
- (2) Crepe Mariette (1)
- Marisa:
- Learn Skills:
- Momiji: Ability to See Far Distances 1 -> 2
- Keine: 3ST - Sword 1 -> 2 / MP Boost 0 -> 2
- Reimu: MP Boost 0 -> 1 / Armored Yin-Yang Orb 0 -> 1
- Nitori: Maintenance 0 -> 1
- Kourin: Effective Formation Change 0 -> 2 / Shopkeeper 0 -> 3
- Kasen: Guts 1 -> 2
- Youmu: Netherworld Dweller 1 -> 2
- Minoriko: Rapid Charge 0 -> 1
- Marisa: MP Boost 2 -> 5
- Level reference: Reimu 11
- Enter the dungeon (3F Center)
- Boss Fight - Komachi Onozuka (Lv12)
- Phase 1 - Buffing
- Portable Machine
- Momiji attack
- 3ST - Sword
- Great Hakurei Barrier
- Portable Machine x2
- Swap Nitori -> Kasen
- Phase 2 - Kasen
- 3ST - Sword
- Exorcising Border
- Swap Reimu -> Minoriko
- Diving Waltz of the Raijuu
- 3ST - Sword
- Buff/Heal Momiji
- Swap Keine <-> Kasen
- Juggle attacks / buffs / debuffs / heals
- Swap Keine -> Cirno when out of MP
- Phase 3 - Kourin/Nitori
- Swap Cirno -> Nitori when SPD debuff
- Swap Minoriko -> Kourin after
- Extending Arm / Diving Waltz of the Raijuu
- Swap Nitori -> any -> Nitori
- Phase 4 - Narrow Confines of Avici
- Swap Nitori -> Reimu when Komachi below 40%
- Buff/Heal to tank Confines of Avici
- Spam strongest attacks available
- Swap Youmu in for extra passive damage
- For finer details see Komachi’ Boss Info
- Phase 1 - Buffing
- Take the stairs to 4F, get the relay point and exit the dungeon
Ocean Stratum (4F ~ 6F)
Explore 4F
- Back at Genokyo, visit these facilities:
- Hakurei Shrine: Level All Characters, apply new bonus
- Komachi HP
- Magic Library:
- Reset Kourin, Keine
- Human Village: Include Komachi in party (slot 12)
- Hakurei Shrine: Level All Characters, apply new bonus
- Open the menu and take the following actions:
- Form Change: Komachi / Kasen / Minoriko / Nitori
- Equipment:
- Kourin:
- (3) Remove
- Komachi:
- (3) Sirloin (3)
- Kourin:
- Learn Skills:
- Komachi: Shinigami Work 0 -> 1 / Ferry Wages 0 -> 3
- Kourin: Shopowner 0 -> 10 / Shopkeeper 0 -> 3
- Keine: Historian School 0 -> 1
- Level reference: Nitori 12
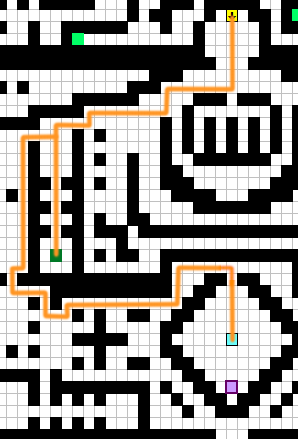
- Enter the dungeon (4F)

- After getting the Violent Green Rupee, farm for a bit
- After reaching 5F, do the blue outline path
- If Nitori won’t reach Lv13, farm before going down to 3F
Explore 5F
- Back at Genokyo, visit these facilities:
- Hakurei Shrine: Level All Characters, apply bonuses
- Marisa, Rumia
- Minoriko, Komachi
- Nitori, Kasen
- Hakurei Shrine: Level All Characters, apply bonuses
- Open the menu and take the following actions:
- Equipment:
- Reimu:
- (2) Ultrafast Granite Keystone (3)
- Komachi:
- (2) Light Crystal (3)
- (M) Violent Green Rupee (2)
- Kasen:
- (if dropped) (3) Legendary Blender (3)
- Nitori:
- (2) Getitup V (4)
- Reimu:
- Learn Skills:
- Komachi: Ferry Wages 3 -> 4
- Kourin: Shopkeeper 3 -> 5
- Rumia: Darkness Manipulation 0 -> 1
- Equipment:
- Level reference: Nitori 13
- Enter the dungeon (5F)
- When you reach the warp, go back to Gensokyo after spending MP
- When you reach the destination, farm until out of MP
Wriggle Side Quest
- When you’re back to Gensokyo, visit the facilities:
- Hakurei Shrine: Level All Characters
- Open the menu and take the following actions:
- Form Change: Momiji / Kasen / Keine / Nitori
- Equipment:
- Kasen:
- (if dropped) (3) Legendary Blender (3)
- Nitori:
- (1) Biggest Sword Ever (1)
- Reimu:
- (3) Cuckri (3)
- Minoriko:
- (3) Super-Hard Rye Bread (3)
- Kasen:
- Learn Skills:
- Kasen: Fighting Spirit 0 -> 1
- Keine: MP Boost 0 -> 1
- Kourin: Shopkeeper 5 -> 6
- Komachi: Ferry Wages 4 -> 5
- Level reference: Nitori 14
- Enter the dungeon (2F Center)
- Go up and fight Kaguya as a boss
- Boss Fight - Kaguya Houraisan (Lv8)
- Spam highest damage spells, you’re overlevelled
- Exit the dungeon and enter back on (3F)
- Move back to 2F and go south for Eirin event
- Exit the dungeon and enter back on (3F)
- Follow the path south, then head west for Wriggle event
- Exit the dungeon and enter back on (3F Center)
- Take the shortcut to the right and fight the Wasp
- Boss Fight - Great Tree’s Poisonous Wasp (Lv11)
- Spam highest damage spells, you’re overlevelled
- Exit the dungeon and enter back on (4F)
- Head north then west on upper area, then fight the Wasp
- Boss Fight - Great Tree’s Paralyzing Wasp (Lv15)
- Momiji just tanks hits and attacks, will probably stay PAR’d
- Kasen spams Higekiri’s Cursed Arm
- Keine spams 3ST - Sword
- Nitori buff x3 -> Super Scope
- For finer details see Para Wasp’s Boss Info
- Head back to Gensokyo and enter the dungeon on (3F)
- Go talk to Eirin on 2F
- Head back to Gensokyo and enter the dungeon on (3F Center)
- Move southeast to get Reisen event
- Go talk to Wriggle and finally recruit her
- Head back to Gensokyo and enter the dungeon on (1F)
- Recruit Parsee and go back to Gensokyo
Hina Fight
- When you’re back at Gensokyo, use these facilities:
- Hakurei Shrine: Level All Characters, apply bonus
- Reimu, Komachi (ATK)
- Nitori, Parsee (MND)
- Wriggle (HP), Kasen
- Magic Library:
- Komachi: ATK/SPD 0 -> 20 (Need 107)
- Parsee: HP/MND 0 -> 30
- Human Village:
- Swap Youmu -> Wriggle
- Swap Cirno -> Parsee
- Nitori Shop:
- Buy Cypress Stick, Booster v0.8, Crazy Milk
- Hakurei Shrine: Level All Characters, apply bonus
- Open the menu and take the following actions:
- Form Change: Parsee / Rumia / Reimu / Wriggle
- Equipment:
- Minoriko:
- (2) Remove
- Parsee:
- (M) Shoes of Happiness (2)
- (1) Symbol of Faith (1)
- (2) Crepe Mariette (1)
- (3) Love Machine 3322 (2)
- Wriggle:
- (3) Bone Stake (3)
- (2) Booster v0.8 (2)
- (1) Crazy Milk (1)
- Komachi:
- (1) DX Mecha Model (1)
- (2) Bracer of Power (1)
- (3) Bracer of Power (1)
- Minoriko:
- Level reference: Nitori 15
- Enter the dungeon (5F South)
- Boss Fight - Hina Kagiyama (Lv20)
- Wriggle cannot die turn 1
- Parsee sponges all the hits and does the switching
- Wriggle spams Comet on Earth
- Sacrifice Rumia, Marisa and Keine at start
- Keep Parsee in slot 2 for switches on same SPD setups
- Watch Hina’s ATB to switch in Reimu/Minoriko to buff/heal
- On Biorhythm of Misfortune God, cast Midnight Anathema Ritual
- Can swap in Nitori and Komachi for big damage chunks
- For finer details see Hina’s Boss Info
- Go up and take the 6F relay, then go back to Gensokyo
Explore 6F
- When you’re back at Gensokyo, open the menu and take these actions:
- Form Change: Komachi / Kasen / Nitori / Rumia
- Enter the dungeon (3F Center)
- FOE Boss Fight - Lesser Golem (Lv14)
- Spam strongest moves, you’re overlevelled
- Take treasures behind the FOE
- Go back to Gensokyo and re-enter the dungeon through (4F)
- Move all the way east to recruit Aya
- Go back to Gensokyo and use these facilities:
- Hakurei Shrine: Level All Characters, apply new bonus
- Komachi (HP)
- Parsee, Aya ATK
- Human Village:
- Swap Momiji -> Aya
- Hakurei Shrine: Level All Characters, apply new bonus
- Open the menu and take the following actions:
- Form Change: Komachi / Kasen / Nitori / Aya
- Equipment:
- Wriggle:
- (1, 2, 3) Remove
- Komachi:
- (3) Sirloin (3)
- (2) Light Crystal (3)
- (1) Crazy Milk (1)
- Kasen:
- (1) DX Mecha Model (1)
- (if dropped) (3) Legendary Blender (3)
- Aya:
- (M) Cypress Stick (1)
- (1) Booster v0.8 (2)
- (2) Bone Stake (3)
- (if Komachi drop) (3) Bone Stake (3)
- Wriggle:
- Learn Skills:
- Komachi: Ferry Wages 5 -> 7
- Nitori: Kappa Ecology Observation 0 -> 1
- Aya: Gensokyo’s Fastest 0 -> 2 / Tengu Wind 0 -> 1
- Kourin: Shopkeeper 6 -> 8
- Level reference: Nitori 16
- Enter the dungeon (6F)
- When you reach the destination, farm until out of MP
- Go back to Gensokyo after farming and visit the facilities:
- Hakurei Shrine: Level All Characters, apply bonus
- Reimu, Marisa, Rumia
- Komachi, Nitori
- Parsee, Kasen
- Nitori Shop:
- Forge Getitup V
- Hakurei Shrine: Level All Characters, apply bonus
- Open the menu and take the following actions:
- Equipment:
- Kasen:
- (3) Getitup V (4)
- Nitori:
- (1) Legendary Blender (3)
- Aya:
- (1) Pale Wing Thruster (2)
- (if free slot) (3) Bone Stake (3)
- Kasen:
- Learn Skills:
- Komachi: Ferry Wages 7 -> 8
- Kourin: Shopkeeper 8 -> 9
- Equipment:
- Level reference: Nitori 16
- Enter the dungeon (6F Center)

- When you reach the destination, farm until Parsee Lv18
Kraken Fight
- Before you do any menuing, do the following action:
- Equipment:
- Reimu:
- (M) Remove
- Reimu:
- Equipment:
- When you’re back to Genokyo, visit the facilities:
- Hakurei Shrine: Level All Characters, apply bonus
- Nitori, Parsee
- Aya, Kasen
- Magic Library:
- Parsee: ATK 0 -> 30
- Kasen: HP/DEF 10 -> 20
- Wriggle learns Toxicologist subclass
- Human Village:
- Swap Reimu -> Momiji
- Hakurei Shrine: Level All Characters, apply bonus
- Open the menu and take the following actions:
- Form Change: Momiji / Kasen / Nitori / Parsee
- Equipment:
- Parsee:
- (M) Cypress Stick (1)
- (3) Biggest Sword Ever (1)
- (2) (if dropped) Legendary Blender (3)
- Momiji:
- (3) Lv70 Lover Snapper’s Scale (2)
- (2) Love Machine 3322 (2)
- Parsee:
- Learn Skills:
- Parsee: Final Blow 0 -> 2 / Flames of Jealousy 0 -> 2
- Wriggle: Enhanced Toxins 0 -> 2 / Numbing Incense 0 -> 2
- Rumia: Darkness Manipulation 1 -> 2
- Level reference: Parsee 18
- Enter the dungeon (5F)
- Take the shortcut and go northwest to fight the Kraken
- Boss Fight - Kraken (Lv19)
- Kasen spams Higekiri’s Cursed Arm
- Parsee spams Jealousy of the Kind and Lovely
- Nitori self buffs and then uses Super Scope 3D
- Momiji swaps self with Aya when Nitori will Super Scope
- For finer details see Kraken’s Boss Info
- Exit the dungeon and go back to Gensokyo
Blue Orchid Fight
- When you’re back at Gensokyo, take the following actions:
- Form Change: Kasen / Wriggle / Aya / Parsee
- Enter the dungeon (6F)
- Take the lower shortcut and fight the Orchid boss
- Boss Fight - Blue Orchid (Lv23)
- DGA Wriggle
- Numbing Incense
- Higekiri’s Cursed Arm
- Jealousy of the Kind
- Swap Wriggle -> Nitori
- DGA Parsee
- Midnight Anathema
- Super Scope 3D
- Higekiri’s Cursed Arm
- Jealousy of the Kind
- Higekiri’s Cursed Arm
- For finer details see Blue Orchid’s Boss Info
- Go back to Gensokyo
Mokou Side Quest
- When back at Gensokyo and use these facilities:
- Hakurei Shrine: Level All Characters
- Use Training Manual x1 on Nitori
- Magic Library:
- Reset Nitori / Wriggle
- Nitori learns Warrior subclass
- Hakurei Shrine: Level All Characters
- Open the menu and take the following action:
- Form Change: Komachi / Kasen / Nitori / Keine
- Learn Skills:
- Komachi: Ferry Wages 8 -> 9
- Nitori: Maintenance 0 -> 1 / Ability to Manip Water 0 -> 2
- Kourin: Shopkeeper 9 -> 10
- Level reference: Nitori 19
- Enter the dungeon (4F Northeast)
- Go up and fight Mokou as a boss
- Boss Fight - Mokou Fujiwara (Lv17)
- Switch things in if anyone dies
- Komachi spams Narrow Confines of Avici
- Kasen spams Diving Waltz of the Raijuu
- Nitori spams Kappa’s Waterfall
- Keine spams 3ST - Sword
- After Mokou resurrects, switch in Marisa for Master Spark
- For finer details see Mokou’s Boss Info
- Go back to Gensokyo and re-enter through (5F)
- Go down and see the event with Mokou and Kaguya
- CHOOSE MOKOU (Just hold A)
- Keep going and recruit Satori
- Retreat to Gensokyo with your new allies
Tenshi 1 Fight
- When you’re back, use these facilities:
- Hakurei Shrine: Level All Characters, apply bonus
- Marisa, Komachi
- Nitori, Parsee
- Kasen, Utsuho (MAG)
- Magic Library:
- Nitori: SPD 0 -> 10
- Kasen: ATK 20 -> 30 / SPD 0 -> 20
- Utsuho: MAG 0 -> 30
- Human Village:
- Swap Momiji -> Utsuho
- Unequip non-party characters
- Hakurei Shrine: Level All Characters, apply bonus
- Open the menu and take the following actions:
- Form Change: Komachi / Kasen / Nitori / Utsuho
- Equipment:
- Minoriko:
- (1, 3) Remove
- Parsee:
- (M) Shoes of Happiness (2)
- Aya:
- (only if no Komachi drop) (3) Remove
- Kasen:
- (1) Bone Stake (3)
- Utsuho:
- (M) Cypress Stick (1)
- (1) Mana Flower (1)
- (if dropped) (2) Mana Flower (1)
- (if dropped) (3) Glow Crystal (3)
- (3) Super-Hard Rye Bread (3)
- Minoriko:
- Learn Skills:
- Komachi: Ferry Wages 9 -> 10
- Kasen: Fighting Spirit 1 -> 2
- Utsuho: MP Boost 0 -> 4 / Blazing 0 -> 2
- Marisa: Magic Training 0 -> 2
- Level reference: Nitori 19
- Enter the dungeon (6F)
- Take the northern shortcut and fight Tenshi
- Boss Fight - Tenshi Hinanawi (Lv40)
- Simply throw characters at the leftmost spots to die
- Concentrate spam since higher delay
- Destroy the Satori rock ahead and take the relay on 7F
- Go back to Gensokyo to heal
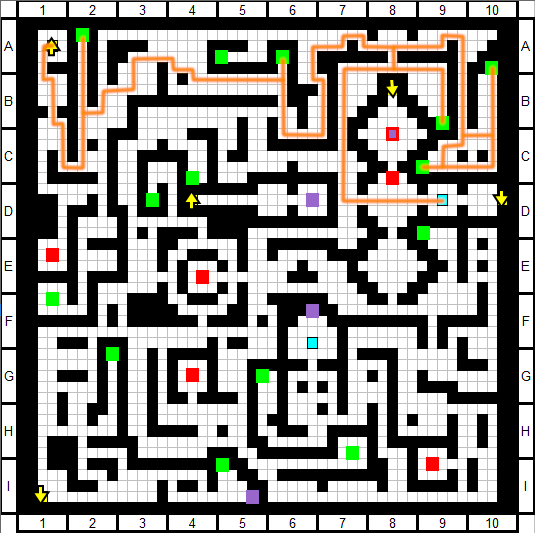
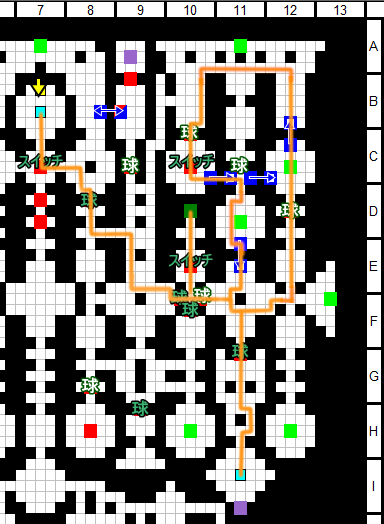
Jungle Stratum (7F ~ 9F)
Explore 7F (West)
- When you’re back, enter the dungeon (7F)
- When you reach the destination, farm until out of MP
Explore 8F (Part 1)
- Go back to Gensokyo and use this facility
- Hakurei Shrine: Level All Characters
- Magic Library:
- Kasen: SPD 20 -> 25 (Need 117)
- Open the menu and take the following actions:
- Equipment:
- Utsuho:
- (3) Glow Crystal (3)
- (if dropped) (2) Mana Flower (1)
- Utsuho:
- Learn Skills:
- Utsuho: MP Boost 4 -> 5
- Equipment:
- Level reference: Nitori 20
- Enter the dungeon (8F)
- When you reach the destinations, farm until out of MP
Explore 7F (East)
- Enter the dungeon (8F)
- When you reach the destination, go back to Gensokyo immediately
- Open the menu and take the following actions:
- Equipment:
- Nitori:
- (1) Asura Blade (4)
- Nitori:
- Equipment:
- Enter the dungeon (7F)
- When you reach the destinations, go back to Gensokyo immediately
Explore 8F (Part 2)
- When you’re back at Gensokyo, use these facilities:
- Hakurei Shrine: Level All Characters, apply bonuses
- Komachi, Nitori
- Parsee, Aya
- Kasen, Utsuho
- Hakurei Shrine: Level All Characters, apply bonuses
- Open the menu and take the following actions:
- Equipment:
- Aya:
- (M) Shoes of Happiness (1)
- Komachi:
- (2) Energy Tank (1)
- Utsuho:
- (if dropped) (3) Mana Flower (1)
- Aya:
- Equipment:
- Level reference: Nitori 21
- Enter the dungeon (8F)
- When you recruit Sanae, farm until Nitori Lv22
Iku Fight
- When you’re back at Gensokyo, use these facilities:
- Hakurei Shrine: Level All Characters, apply bonuses
- Reimu, Momiji (SPD)
- Komachi, Nitori
- Parsee, Wriggle, Aya(HP)
- Kasen, Utsuho
- Satori(HP), Sanae(HP)
- Use Life Gem xALL on Nitori
- Use Fighting Gem xALL on Nitori
- Use Protection Gem xALL on Nitori
- Use Affection Gem xALL on Nitori
- Use Swiftness Gem xALL on Nitori
- Magic Library:
- Reset Nitori
- Nitori learns Warrior subclass
- Aya learns Guardian subclass
- Sanae learns Healer subclass
- Human Village:
- Swap Minoriko -> Reimu
- Swap Marisa -> Momiji
- Swap Rumia -> Satori
- Swap Utsuho -> Sanae
- Nitori Shop:
- Buy Source of Magic x1
- Hakurei Shrine: Level All Characters, apply bonuses
- Open the menu and take the following actions:
- Form Change: Sanae / Wriggle / Aya / Nitori
- Equipment:
- Sanae:
- (M) Cypress Stick (1)
- (3) Crepe Mariette (1)
- (2) Lambda Driver (4)
- (1) Big Bang Wave Cannon (4)
- Aya:
- (M) Source of Magic (1)
- Reimu:
- (1) Symbol of Faith (1)
- (2) Ultrafast Granite Keystone (3)
- (3) Cuckri (3)
- Keine:
- (3, 2, 1) Remove
- Kasen:
- (1) Luster Candy (4)
- Sanae:
- Learn Skills:
- Sanae: Miracle Fruit 1 -> 2 / Youkai Buster 0 -> 2 / Last Wish 0 -> 1
- Wriggle: Comet on Earth 1 -> 5
- Aya: Ability to Manipulate Wind 0 -> 1
- Nitori: Maintenance 0 -> 1 / Overheating 0 -> 1
- Reimu: MP Boost 1 -> 5
- Satori: Trauma Recollection 0 -> 2 / Spell Card Recollection 0 -> 2
- Momiji: Instant Attack 0 -> 1
- Use these facilities again:
- Nitori Shop:
- Sell every material
- Sell every subequip except:
- Booster v0.8
- Green Dream
- Magic Library:
- Reimu: HP 10 -> 30
- Aya: HP 0 -> 30
- Kasen: ATK 30 -> 50
- Sanae: HP 0 -> 30
- Nitori: HP 0 -> 30 / SPD 10 -> 20
- Nitori: Use all money on ATK
- Nitori Shop:
- Level reference: Nitori 22
- Enter the dungeon (8F South)
- Head right to fight Iku
- Boss Fight - Iku Nagae (Lv29)
- Phase 1 - PSN + Buffing
- DGA Wriggle
- Comet on Earth
- Swap Wriggle -> Reimu
- Sanae spams Miracle Fruit on Nitori
- Nitori spams regular attack to build Overheat
- Reimu and Aya juggle buff/heals with IA pivot
- Phase 2 - Overheat 5 Kill
- Swap Reimu with Satori
- Sanae and Satori buff Nitori if possible
- Nitori Extending Arm
- Aya DGA Nitori
- Nitori Extending Arm
- Phase 3 - Emergency
- If not dead and someone lived, swap in Kasen and Parsee
- Spam Higekiri’s Cursed Arm
- Spam Grudge Returning
- For finer details see Iku’s Boss Info
- Phase 1 - PSN + Buffing
- Go back to Gensokyo to heal
Explore 8F (Part 3)
- When you’re back at Gensokyo, use these facilities:
- Hakurei Shrine: Level All Characters
- Magic Library:
- Reset Nitori
- Reincarnate Parsee
- Nitori learns Warrior subclass
- Nitori: Use all money on ATK
- Human Village:
- Swap Sanae -> Marisa
- Swap Reimu -> Rumia
- Swap Momiji -> Minoriko
- Swap Satori -> Utsuho
- Open the menu and take the following actions:
- Form Change: Komachi / Kasen / Nitori / Utsuho
- Equipment:
- Aya:
- (M) Shoes of Happiness (2)
- Nitori:
- (M) Source of Magic (1)
- Aya:
- Learn Skills:
- Nitori: Maintenance 0 -> 1 / Ability Manip Water 0 -> 2
- Kourin: Motivated Heart 0 -> 1
- Parsee: Motivated Heart 0 -> 2
- Level reference: Nitori 23
- Enter the dungeon (8F South)
- When you reach 9F, get the locked chest and farm until out of MP
Explore 9F
- When you’re back at Gensokyo, use these facilities:
- Hakurei Shrine: Level All Characters, apply bonuses
- Komachi, Nitori
- Kasen, Utsuho
- Hakurei Shrine: Level All Characters, apply bonuses
- Open the menu and take the following actions:
- Equipment:
- Parsee:
- (M) Training Egg (1)
- Nitori:
- (1) Glaive of Pain (4)
- Kasen:
- (2) Asura Blade (4)
- Parsee:
- Equipment:
- Level reference: Nitori 23
- Enter the dungeon (9F)
- When you reach the destination event, farm until out of MP
- When you’re back at Gensokyo, use the shrine:
- Hakurei Shrine: Level All Characters
- Level reference: Nitori 24
- Enter the dungeon (9F)
- When you reach the destination farm until out of MP
Tenshi 2 Fight
- When you’re back at Gensokyo, open the menu and take the following actions:
- Equipment:
- Utsuho:
- (M, 1, 2, 3) Remove
- Utsuho:
- Equipment:
- Use these facilities:
- Magic Library:
- Reset Marisa / Rumia / Minoriko
- Reincarnate Nitori
- Reset Aya / Sanae
- Marisa learns Enhancer subclass
- Nitori learns Guardian subclass
- Reisen learns Hexer subclass
- Iku learns Sorcerer subclass
- Nitori: HP 0 -> 40 / DEF 0 -> 30 / SPD 0 -> 30
- Iku: MAG/SPD 0 -> 50
- Human Village:
- Swap Wriggle -> Reimu
- Swap Parsee -> Reisen
- Swap Kasen -> Sanae
- Swap Utsuho -> Iku
- Hakurei Shrine: Level All Characters, apply bonuses
- Reimu, Marisa(SPD)
- Minoriko, Komachi
- Nitori(HP), Aya(ATK)
- Kasen, Reisen(HP)
- Sanae(MAG), Iku(MAG)
- Use Life Gem xALL on Nitori
- Use Magic Gem xALL on Iku
- Use Protection Gem xALL on Nitori
- Use Wisdom Gem xALL on Iku
- Use Swiftness Gem xALL on Iku
- Magic Library:
- Open the menu and take the following actions:
- Form Change: Sanae / Minoriko / Aya / Reisen
- Equipment:
- Reimu:
- (3) Water Cutting Sword (4)
- (1) Star of the Just (5)
- Marisa:
- (1) Remove
- Sanae:
- (3) Century’s End Jacket (4)
- Minoriko:
- (3) Cuckri (3)
- (2) Super-Hard Rye Bread (3)
- Aya:
- (1) The Arch (4)
- Reisen:
- (1) Pale Wing Thruster (2)
- (2) Pale Wing Thruster (2)
- (3) Booster v0.8 (2)
- (M) Cypress Stick (1)
- Nitori:
- (M) First Aid Kit (2)
- (1) Purple Metallic Armor (1)
- (2) Goriki’s Charm (2)
- (3) Intama (2)
- Iku:
- (M) Source of Magic (1)
- (3) Mana Flower (1)
- (2) Mana Flower (1)
- (1) Wash Basin Set (5)
- Marisa:
- (M) Cypress Stick (1)
- Reimu:
- Learn Skills:
- Sanae: Miracle Fruit 1 -> 2 / Youkai Buster 0 -> 2 / Last Wish 0 -> 2
- Minoriko: Ability Control Harvests 0 -> 2 / SPD Boost 0 -> 5
- Aya: HP Boost 0 -> 2 / Gensokyo’s Fastest Lessons 0 -> 2 / Tengu’s Wind 0 -> 2
- Reisen: Intense Vertigo 0 -> 1 / Enhanced Hexes 0 -> 2 / MP Boost 0 -> 2
- Rumia: Darkness Manipulation 0 -> 2 / Youkai Knowledge 0 -> 2
- Nitori: Maintenance 0 -> 1 / Frontline Guard 0 -> 1 / DEF Boost 0 -> 1
- Reimu: Armored YinYang Orb 1 -> 2
- Iku: Hagoromo Sky 0 -> 2 / Enhanced Attack 0 -> 1 / Mind Body One 0 -> 2
- Marisa: Magic Training 0 -> 2 / Art of Battlemage 0 -> 5
- Use these facilities again:
- Hakurei Shrine: Delevel characters
- Delevel Kourin, Keine, Rumia
- Nitori Shop:
- Sell every material
- Sell every subequip except:
- Booster v0.8
- Green Dream
- Magic Library:
- Iku: Use all money on MAG
- Hakurei Shrine: Delevel characters
- Level reference: Nitori 25
- Enter the dungeon (9F)
- Head north to fight Tenshi
- Boss Fight - Tenshi Hinanawi (Lv36)
- Phase 1 - Sacrifice
- Sarutahiko Guidance Minoriko
- Sarutahiko Guidance Minoriko
- Swap Aya -> Iku
- Lunatic Red Eyes
- Miracle Fruit Iku
- Swap Reisen -> Marisa
- Iku attack
- Owotoshi Harvest Sanae
- IF Tenshi PAR’d self:
- Stall for Sanae’s death
- Phase 2 - Concentrate
- Iku spams Attack
- Swap Nitori
- Nitori spams Portable Versatile Machine / Concentrate
- Minoriko juggles Nitori’s buffs and heals
- Marisa spams Art of the Battlemage on Iku
- When near concentrate, swap Minoriko for Rumia/Reisen
- Lineup must be Nitori / Reimu / Komachi on nuke
- Phase 3 - State of Enlightenment
- Repeat phase 2 loop until State of Enlightenment
- Aya can join in to DGA Iku
- For finer details see Tenshi’s Boss Info
- Phase 1 - Sacrifice
- Take the stairs to 10F and get the relay point
- Go back to Gensokyo to heal
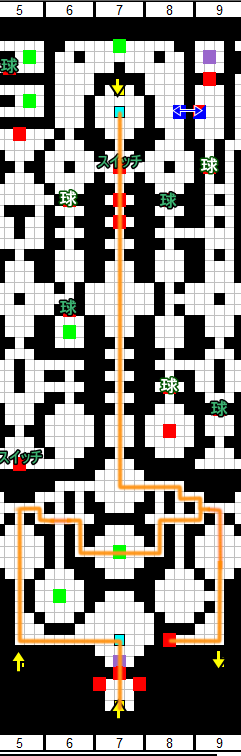
Desert Stratum (10F ~ 12F)
Explore 10F
- When you’re back at Gensokyo, open the menu and take the following actions:
- Equipment:
- Reisen:
- (M, 1) Remove
- Reisen:
- Equipment:
- After that, use these facilities:
- Magic Library:
- Reset Marisa
- Reincarnate Nitori
- Nitori learns Warrior subclass
- Kasen learns Monk subclass
- Nitori: ATK 0 -> 50 / SPD 0 -> 30
- Hakurei Shrine: Level All Characters, apply bonus
- Nitori(ATK)
- Human Village:
- Swap Sanae -> Cirno
- Swap Reimu -> Parsee
- Swap Marisa -> Wriggle
- Swap Reisen -> Kasen
- Magic Library:
- Open the menu and take the following actions:
- Form Change: Komachi / Kasen / Aya / Nitori
- Equipment:
- Kasen:
- (1) Pale Wing Thruster (2)
- Iku:
- (M) Cypress Stick (1)
- (1) Portable Vibrocannon (4)
- Nitori:
- (1) Glaive of Pain (4)
- (2) Getitup V (4)
- (3) Wash Basin Set (5)
- (M) Source of Magic (1)
- Kasen:
- Learn Skills:
- Komachi Short Life Expectancy 1 -> 2
- Nitori: Cooling Down 0 -> 1 / Maintenance 0 -> 1
- Level reference: Nitori 26
- Enter the dungeon (10F)
- After getting last treasure, farm until Nitori out of MP
- When you’re back at Gensokyo, use these facilities:
- Hakurei Shrine: Level All Characters
- Open the menu and take the following actions:
- Equipment:
- Iku:
- (2) Tisiphone Edge (4)
- Iku:
- Equipment:
- Level reference: Nitori 27
- Enter the dungeon (10F)
- When you reach the destination, farm until Nitori 2400 EXP away from Lv29
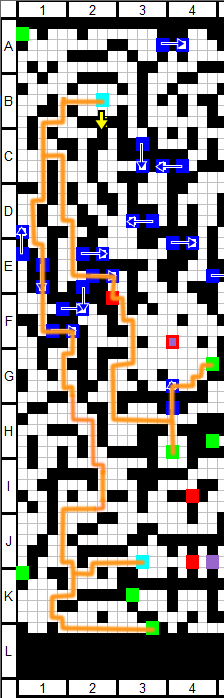
Gold Hymn Fight
- When you’re back at Gensokyo, use these facilities:
- Hakurei Shrine: Level All Characters, apply bonus
- Cirno(SPD), Komachi
- Nitori, Aya
- Kasen, Reisen
- Sanae, Iku
- Hakurei Shrine: Level All Characters, apply bonus
- Open the menu and take the following actions:
- Form Change: Keine / Kasen / Aya / Nitori
- Equipment:
- Kasen:
- (M) Purple Orb (1)
- Nitori:
- (M) Purple Orb (1)
- Aya:
- (M) Source of Magic (1)
- Iku:
- (M) Purple Orb (1)
- (3) Forbidden Tablet (4)
- Cirno:
- (3) Booster v0.8 (2)
- (2) Booster v0.8 (2)
- (1) Booster v0.8 (2)
- (M) Cypress Stick (1)
- Kasen:
- Learn Skills:
- Kourin: Motivated Heart 1 -> 2
- Cirno: Icicle Fall 3 -> 5
- Level reference: Nitori 28
- Enter the dungeon (10F) and head east for FOE
- FOE Boss Fight - Gold Hymn (Lv36)
- Aya DGAs Keine, then Nitori twice
- Keine spams 3ST - Sword
- Kasen spams Diving Waltz of Raijuu to keep PAR
- Nitori spams Kappa’s Watterfall
- For finer details see Gold Hymn’ Boss Info
- Get the treasure behind FOE, then exit the dungeon
- Re-enter to talk to Kanako and then again for Suwako
Remilia & Sakuya Fight
- When you’re back at Gensokyo, use these facilities:
- Hakurei Shrine: Level All Characters
- Nitori/Aya to HP
- Use Training Manual x1 on Komachi
- Use Life Gem xALL on Nitori
- Use Magic Gem xALL on Iku
- Use Protection Gem xALL on Nitori
- Use Wisdom Gem xALL on Iku
- Use Swiftness Gem xALL on Iku
- Delevel Kourin, Keine
- Magic Library:
- Reset Komachi / Nitori / Sanae
- Nitori learns Guardian subclass
- Aya learns Guardian subclass
- Human Village:
- Swap Rumia -> Reisen
- Swap Wriggle -> Sanae
- Hakurei Shrine: Level All Characters
- Open the menu and take the following actions:
- Form Change: Nitori / Aya / Komachi / Reisen
- Equipment:
- Kasen:
- (1) Luster Candy (4)
- Nitori:
- (M) First-Aid Kit (2)
- (2) Aegis Button (2)
- Reisen:
- (1) Pale Wing Thruster (2)
- Kasen:
- Learn Skills:
- Nitori: DEF Boost 0 -> 3 / Frontline Guard 0 -> 1 / Maintenance 0 -> 1
- Aya: EVA Boost 0 -> 2
- Komachi: Shinigami Work 0 -> 1 / Ferriage Fog 1 -> 5
- Sanae: Miracle Fruit 1 -> 5 / Youkai Buster 0 -> 2
- Use these facilities again:
- Nitori Shop:
- Sell every material
- Sell every subequip except:
- Green Dream
- Magic Library:
- Nitori: HP 0 -> 50 / ATK 50 -> 60 / DEF 0 -> 50
- Reisen: HP 0 -> 20
- Iku: Use all money on MAG
- Nitori Shop:
- Enter the dungeon (10F southwest) and head for the boss
- Level reference: Komachi 27
- Boss Fight - Remilia Scarlet & Sakuya Izayoi (Lv43)
- Phase 1 - DTH Sakuya
- Aya DGA Komachi twice for Ferriage in Deep Fog DTH (15%)
- Reisen spams Lunatic Red Eyes
- Nitori buffs self with PVM
- No DTH proc or Reisen dead = reset
- Phase 2 - Remilia
- Nitori self buffs and switches, Super Scopes at end
- Aya plays switch and DGA support
- Swap in Cirno to debuff SPD with Icicle Fall
- Reisen spams LRE until MND debuff is big enough, can also Discarder
- Iku spams EDP until DEF debuff is big enough
- Sanae must buff Iku for extra damage, stay out for Youkai Buster
- Kasen acts as a secondary attacker for when DEF debuff is present
- For finer details see RemiSaku’s Boss Info
- Phase 1 - DTH Sakuya
- Take the stairs to 11F and get the relay circle, then retreat to Gensokyo
Explore 11F
- When you’re back at Gensokyo, use these facilities:
- Hakurei Shrine: Level All Characters, apply bonuses
- Komachi, Nitori(ATK)
- Aya(ATK), Iku
- Magic Library:
- Reset Komachi / Nitori / Aya / Iku
- Nitori learns Warrior subclass
- Aya learns Monk subclass
- Iku learns Monk subclass
- Human Village:
- Swap Reisen -> Rumia
- Swap Sanae -> Wriggle
- Hakurei Shrine: Level All Characters, apply bonuses
- Open the menu and take the following actions:
- Form Change: Komachi / Aya / Nitori / Iku
- Equipment:
- Aya:
- (M) Shoes of Happiness (2)
- Nitori:
- (M) Purple Orb (1)
- (2) Getitup V (4)
- Aya:
- Learn Skills:
- Komachi: Shinigami Work 0 -> 1 / Ferry Wages 0 -> 10 / Short Life Expectancy 1 -> 3
- Aya: Gensokyo Fastest 0 -> 2 / Tengu Wind 0 -> 2 / HP Boost 0 -> 4
- Nitori: Ability Manip Water 0 -> 2 / Maintenance 0 -> 1
- Iku: Hagoromo Sky 0 -> 2 / Lightning Fish 0 -> 1 / Area Attack 0 -> 1
- Level reference: Nitori 30
- Enter the dungeon (11F)
- When you reach the destination, go back to Gensokyo immediately
- When you’re back at Gensokyo, use these facilities:
- Hakurei Shrine: Level All Characters
- Magic Library:
- Komachi learns Guardian subclass
- Open the menu and take the following actions:
- Equipment:
- Komachi:
- (1) Yggdrasil Dew (1)
- Komachi:
- Equipment:
- Level reference: Nitori 30
- Enter the dungeon (11F)
- When you reach the 12F relay circle, go back to Gensokyo immediately
Explore 12F
- When you’re back at Gensokyo, use these facilities:
- Hakurei Shrine: Level All Characters, apply bonuses
- Komachi, Nitori
- Aya, Kasen, Iku
- Hakurei Shrine: Level All Characters, apply bonuses
- Open the menu and take the following actions:
- Equipment:
- Aya:
- (3) Meteor Drive (5)
- Aya:
- Equipment:
- Level reference: Nitori 31
- Enter the dungeon (12F)
- Once you get to the relay point, go back to Gensokyo immediately
- When you’re back at Gensokyo, use these facilities:
- Hakurei Shrine: Level All Characters
- Open the menu and take the following actions:
- Equipment:
- Aya:
- (2) Wallbreaker Armband (5)
- Aya:
- Equipment:
- Level reference: Nitori 31
- Enter the dungeon (12F)
- Once you get to the relay point, go back to Gensokyo immediately
Golden Mirror Fight
- When you’re back at Gensokyo, use these facilities:
- Hakurei Shrine: Level All Characters
- Komachi(SPD), Aya(HP), Reisen
- Delevel Kourin, Keine, Rumia
- Magic Library:
- Reset Komachi
- Human Village:
- Swap Wriggle -> Reisen
- Hakurei Shrine: Level All Characters
- Open the menu and take the following actions:
-
- Form Change: Kasen / Aya / Komachi / Reisen
- Equipment:
- Komachi:
- (3) Energy Pack (5)
- Komachi:
- Learn Skills:
- Komachi: Ferriage Fog 1 -> 5 / Shinigami Work 0 -> 1 / Ferry Wages 0 -> 5
-
- Level reference: Reisen 31
- Enter the dungeon (12F west) and go fight the Mirror
- Boss Fight - Golden Mirror (Lv48)
- If Reisen dies or Komachi fails thrice, reset
- Hit the 9% DTH proc on Komachi’s Ferriage in the Deep Fog
- Aya DGAs Komachi for try #1
- Sarutahiko self while Komachi does try #2
- DGA again for try #3
- Reisen spams Grand Patriot’s Elixir so she lives
- Komachi spams Ferriage in Deep Fog for DTH
- For finer details see Golden Mirror’s Boss Info
- When you’re done, retreat to Gensokyo
Magatama Fight
- Enter the dungeon (12F east) and go fight the Magatama
- Boss Fight - Magatama of Amber Fangs (Lv48)
- If Reisen dies or Komachi fails thrice, reset
- Hit the 9% DTH proc on Komachi’s Ferriage in the Deep Fog
- Aya DGAs Komachi for try #1
- Sarutahiko self while Komachi does try #2
- DGA again for try #3
- Reisen spams Grand Patriot’s Elixir so she lives
- Komachi spams Ferriage in Deep Fog for DTH
- For finer details see Magatama’s Boss Info
- When you’re done, retreat to Gensokyo
Tenshi 3 Fight
- When you’re back at Gensokyo, use these facilities:
- Hakurei Shrine: Level All Characters
- Open the menu and take the following actions:
- Form Change: Komachi / Aya / Nitori / Iku
- Level reference: Nitori 33
- Enter the dungeon (12F)
- Once you’ve reached the relay point, go back to Gensokyo
- When you’re back on Gensokyo, use these facilities:
- Hakurei Shrine: Level All Characters, apply bonus
- Marisa, Komachi
- Nitori, Aya
- Reisen, Sanae, Iku
- Use Training Manual xALL on Iku
- Use Wisdom Gem xALL on Iku
- Use Swiftness Gem xALL on Iku
- Delevel Kourin, Keine, Rumia
- Magic Library:
- Reset Sanae / Iku
- Marisa learns Enhancer subclass
- Iku learns Sorcerer subclass
- Iku: Use all money on MAG
- Human Village:
- Swap Nitori -> Marisa
- Swap Cirno -> Sanae
- Hakurei Shrine: Level All Characters, apply bonus
- Open the menu and take the following actions:
- Form Change: Sanae / Minoriko / Aya / Reisen
- Learn Skills:
- Sanae: Miracle Fruit 1 -> 5 / Youkai Buster 0 -> 1 / Last Wish 0 -> 2
- Reisen: SPD Boost 0 -> 5
- Marisa: Magic Training 0 -> 2 / Enhanced Buffing 0 -> 1 / Art of the Battlemage 0 -> 5
- Iku: Hagoromo Sky 0 -> 2 / Magic Beating 0 -> 2 / Mind Body 0 -> 2 / Enhanced Attack 0 -> 1 / Mind Assault 0 -> 1
- Level reference: Aya 33
- Enter the dungeon (12F depths) and fight Tenshi
- Boss Fight - Tenshi Hinanawi (Lv50)
- Phase 1 - Sacrifice
- Sarutahiko Guidance Minoriko
- Sarutahiko Guidance Minoriko
- Swap Aya -> Iku
- Lunatic Red Eyes
- Miracle Fruit Iku
- Swap Reisen -> Marisa
- Iku attack
- Owotoshi Harvest Sanae
- IF Tenshi PAR’d self:
- Stall for Sanae’s death
- Phase 2 - Quick Kill
- Iku spams Attack
- Marisa spams Art of the Battlemage on Iku
- Minoriko swaps in Aya then self with Reisen/Rumia
- Marisa spams Art of the Battlemage on Iku
- Reisen spams Lunatic Red Eyes
- Aya spams DGA on Iku
- REMOVE REISEN FROM FRONT BEFORE KILL
- Phase 3 - Murakumo DTH
- Swap in Reisen
- Yuyuko spams Saigyouji Flawless Nirvana (28% with Reisen, 8% otherwise)
- Keep Yuyuko and Reisen alive
- Komachi can work as a backup (9% with Reisen)
- Aya can speed up attempts
- For finer details see Tenshi’s Boss Info
- Phase 1 - Sacrifice
- When you’re done, move to 13F and take the relay circle
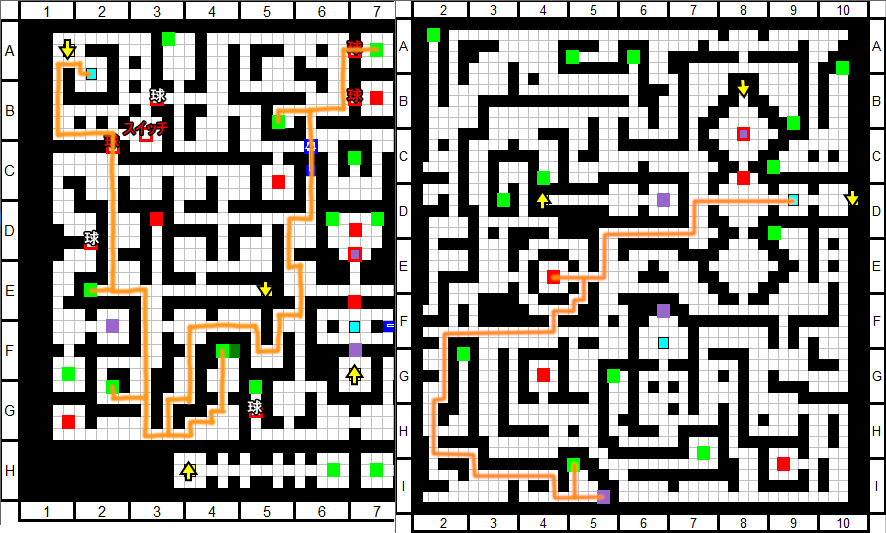
Fire Stratum (13F ~ 15F)
Explore 13F (Part 1)
- When you’re back on Gensokyo, use these facilities:
- Hakurei Shrine: Level All Characters
- Magic Library:
- Reset Komachi, Iku
- Komachi learns Guardian subclass
- Iku learns Monk subclass
- Human Village:
- Swap Sanae -> Cirno
- Swap Rumia -> Nitori
- Swap Marisa -> Wriggle
- Swap Reisen -> Suwako
- Open the menu and take the following actions:
- Form Change: Komachi / Aya / Nitori / Iku
- Equipment:
- Nitori:
- (if Murakumo DTH) (1) Cinderforge Sword (5)
- Suwako:
- (M) Shoes of Happiness (2)
- Nitori:
- Learn Skills:
- Komachi: Short Life Expectancy 1 -> 4 / Ferry Wages 0 -> 10 / Shinigami Work 0 -> 1
- Nitori: Cooling Down 0 -> 1
- Iku: Hagoromo Sky 0 -> 2 / Lightning Fish 0 -> 1 / Area Attack 0 -> 1
- Suwako: Motivated Heart 0 -> 2
- Level reference: Nitori 35
- Enter the dungeon (13F)
- When you reach the -4 orb, go back to Gensokyo
- Open the menu and take the following actions:
- Equipment:
- Iku:
- (2) Wash Basin Set (5)
- Iku:
- Equipment:
- Enter the dungeon (13F)
- When you reach the 14F relay circle, keep going until next relay point
Explore 14F (Part 1)

- When you reach the relay circle, go back to Gensokyo immediately
Memorized Knowledge Fight
- When you’re back on Gensokyo, use these facilities:
- Magic Library:
- Reset Cirno, Nitori, Parsee
- Reincarnate Iku
- Nitori learns Guardian subclass
- Iku: MAG/SPD 0 -> 50
- Parsee: Use all money on ATK
- Hakurei Shrine: Level All Characters, apply bonus
- Momiji, Komachi, Nitori(HP)
- Parsee (ATK), Aya
- Kasen, Reisen(SPD)
- Sanae, Iku (MAG)
- Use Training Manual xALL on Parsee
- Use Magic Gem xALL on Parsee
- Use Fighting Gem xALL on Parsee
- Human Village:
- Swap Iku -> Momiji
- Swap Wriggle -> Reisen
- Swap Suwako -> Sanae
- Magic Library:
- Open the menu and take the following actions:
- Form Change: Nitori / Aya / Sanae / Parsee
- Equipment:
- Nitori:
- (M) First-Aid Kit (2)
- (1) Olzhas Shamshir (5)
- (2) Olzhas Shamshir (5)
- Parsee:
- (3) Cinderforge Sword / Glaive of Pain (5)
- (2) Glaive of Pain (4)
- (1) Glaive of Pain (4)
- (M) Strange Meat Pie (2)
- Kasen:
- (1) War Mask of the Butcher (5)
- Nitori:
- Learn Skills:
- Nitori: MND Boost 0 -> 5 / AFF Boost 0 -> 5 / Maintenance 0 -> 1
- Parsee: Final Blow 0 -> 2 / Flames of Jealousy 0 -> 2 / Grudge Returning 1 -> 5
- Kasen: SPD Boost 0 -> 5
- Cirno: Blizzard Blowout 0 -> 5
- Before entering the dungeon, revisit the shrine:
- Hakurei Shrine: Delevel characters
- Delevel Kourin, Keine, Cirno, Minoriko, Komachi
- Hakurei Shrine: Delevel characters
- Level reference: Nitori 36
- Enter the dungeon (14F east) and go fight the boss
- Boss Fight - Memorized Knowledge (Lv55)
- Phase 1 - Preparation
- Aya buffs Sanae SPD twice
- Sanae spams Miracle Fruit on Parsee
- Aya switches self for Reisen
- Nitori IA pivots Sanae
- Parsee uses Grudge Returning
- Reisen spams Discarder
- If TRR proc’d:
- Nitori swaps Sanae with Cirno
- Parsee uses Jealousy of the Kind and Lovely
- Form Change Nitori / Kourin / Cirno / Keine
- Phase 2 - Quick Kill
- Nitori swaps in Momiji, who swaps in Parsee
- Parsee concentrates
- Nitori swaps in Sanae
- Momiji swaps self with Reisen
- Sanae spams Miracle Fruit on Parsee
- Nitori and Reisen IA pivot Sanae and Parsee
- Parsee uses Grudge Returning
- If TRR does not proc:
- Concentrate -> Grudge Returning until proc
- Parsee uses Jealousy of the Kind and Lovely
- At low HP, Nitori and Kasen finish
- For finer details see Memorized Knowledge’s Boss Info
- Phase 1 - Preparation
- When you’re done, simply go back to Gensokyo
Explore 13F (Part 2)
- When you’re back on Gensokyo, visit the following facilities:
- Hakurei Shrine: Level All Characters
- Change Nitori to ATK
- Magic Library:
- Reset Nitori
- Reincarnate Parsee
- Nitori learns Warrior subclass
- Iku learns Monk subclass
- Nitori: Use all money on ATK
- Human Village:
- Swap Momiji -> Wriggle
- Swap Reisen -> Iku
- Swap Sanae -> Suwako
- Hakurei Shrine: Level All Characters
- Open the menu and take the following actions:
- Form Change: Komachi / Aya / Nitori / Iku
- Equipment:
- Parsee:
- (3) Remove
- (M) Training Egg (2)
- Suwako:
- (M) Training Egg (2)
- Nitori:
- (M) Master’s Emblem (1)
- (2) Getitup V (4)
- (1) Cinderforge Sword / Glaive of Pain (5)
- Parsee:
- Learn Skills:
- Nitori: Cooling Down 0 -> 1 / Ability Manip Water 0 -> 2 / Maintenance 0 -> 1
- Iku: Hagoromo Sky 0 -> 2 / Lightning Fish 0 -> 2 / Area Attack 0 -> 1
- Parsee: Motivated Heart 0 -> 2
- Level reference: Nitori 37
- Enter the dungeon (13F) and reset the temperature
- After getting the 14F relay, get the leftmost treasure then leave
Explore 14F (Part 2)
- Enter the dungeon (14F center west)

- When you reach the 15F relay, keep exploring!
Explore 15F
- No need to re-enter the dungeon, just keep exploring:
- When you are done, leave and re-enter from (15F Center)
- After fleeing from FOE, return to Gensokyo
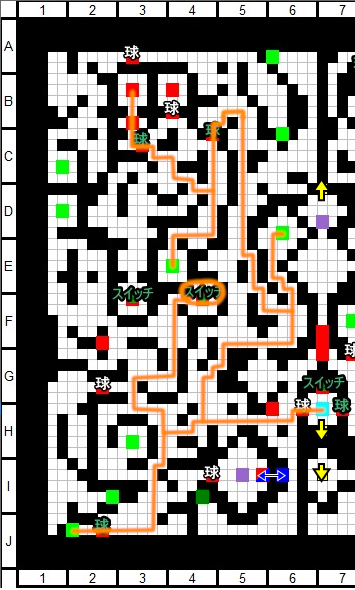
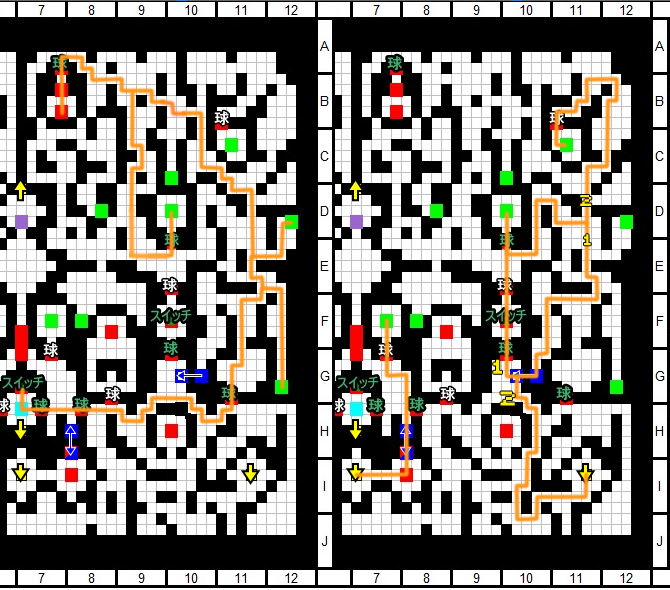
Yuuka Side Quest
- When you’re back on Gensokyo, check Minoriko’s BP
- Need 400 BP on her, 3 per battle in 14F with her in front
- Form Change: Aya / Nitori / Iku / Minoriko
- Level reference: Nitori 43
- Locations: (3F, 5F south, 8F south, 10F southwest, 14F center east hole)
- When you’re done with all events, go back to Gensokyo
- When you’re back on Gensokyo, use these facilities:
- Hakurei Shrine: Level All Characters, apply bonuses
- Kourin, Cirno
- Minoriko(HP), Komachi
- Nitori, Aya(HP)
- Kasen, Sanae
- Use Life gem xALL on Nitori
- Use Fighting gem xALL on Nitori
- Use Affection gem xALL on Nitori
- Use Swiftness gem xALL on Nitori
- Use Tome of Insight - Vitality on Kourin
- Magic Library:
- Reset Marisa, Kourin, Nitori
- Kourin learns Guardian subclass
- Minoriko learns Enhancer subclass
- Nitori learns Warrior subclass
- Human Village:
- Swap Wriggle -> Sanae
- Hakurei Shrine: Level All Characters, apply bonuses
- Open the menu and take the following actions:
- Form Change: Cirno / Kourin / Sanae / Kasen
- Equipment:
- Kourin:
- (M) First-Aid Kit (2)
- (1) Energy Pack (5)
- (2) Green Dream (2)
- (3) Star World Bracelet (2)
- Sanae:
- (M) Purple Orb (1)
- Nitori:
- (2) Green Dream (2)
- Minoriko:
- (2) Divine Barrier (5)
- (1) Rosebush Robe (2)
- Kourin:
- Learn Skills:
- Kourin: HP High Boost 0 -> 5 / Effective Form Change 0 -> 2
- Sanae: Youkai Buster 1 -> 2
- Kasen: HP Boost 0 -> 5
- Nitori: Maintenance 0 -> 1 / Ability Manip Water 0 -> 2 / Overheating 0 -> 1 / Tension Up 0 -> 2
- Minoriko: Symbol of Harvest 0 -> 2 / Art of the Battlemage 0 -> 5
- Aya: HP Boost 4 -> 5 / EVA Boost 0 -> 5
- Use these facilities again:
- Nitori Shop:
- Sell every material
- Sell every subequip except:
- Dark Magic Grimoire
- Intama
- Magic Library:
- Kourin: HP/MND/SPD 0 -> 50
- Sanae: HP 30 -> 50 / MND 0 -> 50
- Nitori: MND 0 -> 50
- Nitori: Use all money on ATK
- Nitori Shop:
- Enter the dungeon (9F) and unlock Yuuka’s room
- Re-enter after saving and fight Yuuka
- Boss Fight - Yuuka Kazami (Lv53)
- Phase 1 - Blizzard Blowout
- Wait for Cirno to die, spam Icicle Fall
- Sanae juggles Miracle Fruit on Kasen and heals
- Kasen spams Higekiri’s Cursed Arm
- Kourin spams Battle Command on Kasen
- Phase 2 - Damage Rush
- Swap in Minoriko where Cirno was
- Minoriko juggles heals, buffs and switches
- Swap Kasen with Nitori
- Sanae spams Miracle Fruit on Nitori
- Nitori spams Kappa Waterfall
- Occasionally swap Sanae with Aya
- Aya DGAs Nitori with good timing
- Phase 3 - Master Spark
- Damage rush with Nitori and Kasen
- If Master Spark is inevitable, tank with Kasen Guts
- For finer details see Yuuka’s Boss Info
- Phase 1 - Blizzard Blowout
- When you’re done, go back to Gensokyo
Silver Mail Fight
- Open the menu and take the following actions:
- Form Change: Aya / Nitori / Sanae / Kasen
- Enter the dungeon (10F) and go west to fight FOE
- FOE Boss Fight - Silver Mail (Lv36)
- Aya DGA Nitori into Super Scope 3D, twice
- For finer details see Silver Mail’s Boss Info
- When you’re done, take the treasure and go back to Gensokyo
Yuyuko Fight
- Open the menu and take the following actions:
- Equipment:
- Kourin:
- (M, 1, 2, 3) Remove
- Nitori:
- (1) Remove
- Kourin:
- Equipment:
- When you’re back on Gensokyo, use these facilities:
- Human Village:
- Swap Iku -> Reimu
- Swap Nitori -> Momiji
- Swap Minoriko -> Satori
- Swap Suwako -> Yuuka
- Magic Library:
- Reset Kourin / Minoriko / Komachi / Parsee
- Reincarnate Nitori / Kasen
- Momiji learns Herbalist subclass
- Komachi learns Guardian subclass
- Parsee learns Gambler subclass
- Satori: HP/SPD 0 -> 50
- Yuuka: HP/SPD 0 -> 50
- Parsee: SPD 0 -> 70
- Parsee: Use all money on ATK
- Hakurei Shrine: Level All Characters, apply new bonus
- Switch Momiji to SPD
- Switch Komachi to HP
- Switch Parsee to ATK
- Satori, Yuuka HP
- Use Training Manual xALL on Parsee
- Use Life gem xALL on Sanae
- Use Fighting gem xALL on Parsee
- Use Wisdom gem xALL on Sanae
- Use Affection gem xALL on Sanae
- Use Swiftness gem xALL on Sanae
- Human Village:
- Open the menu and take the following actions:
- Form Change: Komachi / Cirno / Reimu / Kasen
- Equipment:
- Komachi:
- (M) First-Aid Kit (2)
- Reimu:
- (1, 3) Remove
- Satori:
- (M) First-Aid Kit (2)
- (1) Yggdrasil Dew (1)
- (2) Courtesan’s Sorrow (3)
- (3) Dark Magic Grimoire (2)
- Parsee:
- (3) Cinderforge Sword / Glaive of Pain (5)
- (M) Strange Meat Pie (2)
- Sanae:
- (2) Star of the Just (5)
- Yuuka:
- (1) Energy Pack (5)
- (2) Sirloin (3)
- (3) Dark Magic Grimoire (2)
- (M) First-Aid Kit (2)
- Komachi:
- Learn Skills:
- Komachi: HP Boost 0 -> 5 / Frontline Guard 0 -> 1 / Regeneration 0 -> 1 / Ferry Wages 0 -> 10
- Reimu: Final Prayer 0 -> 2
- Kourin: Shopowner 0 -> 10 / Shopkeeper 0 -> 10 / Motivated Heart 0 -> 2
- Satori: Small MP Recovery 0 -> 1 / MP Boost 0 -> 5
- Parsee: Final Blow 0 -> 2 / Flames of Jealousy 0 -> 2 / High Stakes 0 -> 2 / Jealousy of the Kind 1 -> 5
- Momiji: Herb of Awakening 0 -> 5
- Yuuka: Extra Attack 0 -> 2 / HP/MP Boost 0 -> 5
- Use the shrine again to delevel:
- Hakurei Shrine: Delevel characters
- Delevel Reimu, Keine, Cirno, Kasen
- Hakurei Shrine: Delevel characters
- Enter the dungeon (15F) and go fight Yuyuko
- Boss Fight - Yuyuko Saigyouji (Lv60)
- ATK Thresholds (no buffs / 20% / 50%):
- 4800 -> 3.306M / 2.618M / 1.973M
- 5000 -> 3.137M / 2.485M / 1.873M
- 5200 -> 2.983M / 2.365M / 1.782M
- 5400 -> 2.842M / 2.254M / 1.699M
- 5600 -> 2.713M / 2.153M / 1.622M
- 5800 -> 2.595M / 2.059M / 1.551M
- Phase 1 - TRR Proc
- Swap in Momiji -> Sanae -> Parsee
- Sanae uses Miracle Fruit on Parsee
- Swap Sanae for Yuuka
- Parsee uses Midnight Anathema Ritual (86% to proc TRR)
- Swap Parsee with Satori
- Phase 2 - Beauty of Nature
- Yuuka and Satori spam Beauty of Nature
- Swap Momiji with Sanae
- Komachi IA pivots Yuuka and Satori
- Sanae juggles healing and IA pivoting
- Phase 3 - Jealousy of the Kind
- TRR reaches threshold
- Swap in Momiji -> Parsee on slots 3 and 4
- Sanae uses Miracle Fruit on Parsee once
- Momiji uses Herb of Awakening on Parsee
- Parsee delays her turn if needed then Jealousy of the Kind
- For finer details see Yuyuko’s Boss Info
- ATK Thresholds (no buffs / 20% / 50%):
- When you’re done, go back to Gensokyo
Azure Giant Fight
- Before you do any menuing, do the following action:
- Equipment:
- Kasen:
- (M) Remove
- Kasen:
- Equipment:
- When you’re back on Gensokyo, use these facilities:
- Hakurei Shrine: Level All Characters, apply bonus
- Aya(SPD), Reisen, Yuyuko(SPD)
- Delevel Kourin, Cirno
- Human Village:
- Swap Reimu -> Reisen
- Swap Kasen -> Yuyuko
- Hakurei Shrine: Level All Characters, apply bonus
- Open the menu and take the following actions:
- Form Change: Kourin / Aya / Yuyuko / Reisen
- Equipment:
- Yuyuko:
- (M) Dark Determination (2)
- Yuyuko:
- Learn Skills:
- Yuyuko: Saigyouji Flawless Nirvana 1 -> 5
- Enter the dungeon (15F center) and go fight the Giant
- Boss Fight - Glowing Azure Giant (Lv62)
- If Reisen dies or Yuyuko fails twice, reset
- Hit the 56% DTH proc on Yuyuko’s Saigyouji Flawless Nirvana
- Aya DGAs Yuyuko for try #1
- DGA again for try #2
- For finer details see Azure Giant’s Boss Info
- Level reference: Aya 43
- When you’re done, go back to Gensokyo
Yukari Fight
- When you’re back on Gensokyo, use these facilities:
- Nitori Shop:
- Sell 1x Getitup V (4)
- Sell 1x Asura Blade (4)
- Sell 1x Lambda Driver (4)
- Hakurei Shrine: Level All Characters, apply bonus
- Kourin, Cirno
- Komachi, Parsee
- Aya, Satori
- Sanae, Yuuka
- Use Tome of Insight - Attack on Parsee
- Delevel Keine, Cirno, Nitori, Suwako
- Magic Library:
- Reset Kourin / Parsee / Aya / Satori / Yuuka
- Parsee learns Monk subclass
- Aya learns Strategist subclass
- Satori learns Monk subclass
- Yuuka learns Monk subclass
- Human Village:
- Swap Yuyuko -> Nitori
- Swap Reisen -> Suwako
- Nitori Shop:
- Open the menu and take the following actions:
- Form Change: Aya / Parsee / Yuuka / Satori
- Equipment:
- Cirno:
- (M, 1, 2, 3) Remove
- Komachi:
- (M) Violent Green Rupee (2)
- Aya:
- (M) First-Aid Kit (2)
- Satori:
- (2) Meteor Drive (5)
- Kourin:
- (M) Chariot Boots (2)
- (1) Booster v0.8 (2)
- (2) Booster v0.8 (2)
- (3) Booster v0.8 (2)
- Cirno:
- Learn Skills:
- Aya: HP Boost 0 -> 2 / Gensokyo Fastest 0 -> 2 / Tengu Wind 0 -> 2 / Ironclad Strat 0 -> 10 / Raid Maneuver 0 -> 1
- Parsee: Fast Dash 0 -> 1 / Jealousy of the Kind 1 -> 5 / Flames of Jealousy 0 -> 2 / Final Blow 0 -> 2 / ATK Boost 0 -> 5
- Yuuka: Extra Attack 0 -> 2 / Fast Dash 0 -> 1 / MP Boost 0 -> 5
- Satori: MP Boost 0 -> 5 / Small MP Recovery 0 -> 1 / Spell Recollection 0 -> 2 / Fast Dash 0 -> 1
- Kourin: Effective Formation 0 -> 2 / First Aid 1 -> 2 / HP Boost 0 -> 5
- Use these facilities again:
- Magic Library:
- Parsee: Use all money on ATK
- Magic Library:
- Enter the dungeon (15F)
- When you get to the relay point, re-enter the dungeon and fight Yukari
- Boss Fight - Yukari Yakumo (Lv66)
- ATK Thresholds (no buffs / 20% / 50% /// [Youkai Buster] no buffs / 20%):
- 5100 -> 1545k / 1167k / 827k /// 1246k / 931k
- 5300 -> 1456k / 1100k / 778k /// 1172k / 875k
- 5500 -> 1375k / 1039k / 734k /// 1104k / 824k
- 5700 -> 1302k / 984k / 694k /// 1043k / 778k
- 5900 -> 1234k / 933k / 656k /// 987k / 736k
- 6100 -> 1173k / 886k / 622k /// 936k / 696k
- 6300 -> 1116k / 842k / 590k /// 889k / 660k
- 6500 -> 1064k / 802k / 560k /// 845k / 627k
- 6700 -> 1015k / 765k / 532k /// 805k / 596k
- Phase 1 - TRR Proc
- Reset if less than 2 full ATBs (53% odds)
- 14.06 (3) / 38.94 (2) / 35.94 (1) / 11.06 (0)
- Aya DGAs whoever didnt get a full ATB If everyone has a full ATB, waste turn
- Parsee uses Midnight Anathema Ritual (54% proc)
- Yuuka and Satori use Beauty of Nature
- Swap Parsee with Kourin
- Reset if less than 2 full ATBs (53% odds)
- Phase 2 - Beauty of Nature
- Aya IA pivots / DGAs Yuuka
- Yuuka and Satori spam Beauty of Nature
- Kourin swaps Satori and Sanae as needed
- Sanae heals everyone with Yasaka’s Divine Wind
- Can swap Cirno in to fish for SPD debuff
- Phase 3 - Jealousy of the Kind
- TRR reaches threshold
- Move Sanae to slot 1, swap in Parsee in slot 4
- Sanae uses Miracle Fruit on Parsee
- Swap in Momiji whenever
- Momiji uses Herb of Awakening on Parsee
- Parsee delays her turn if needed then Jealousy of the Kind
- For finer details see Yukari’s Boss Info
- ATK Thresholds (no buffs / 20% / 50% /// [Youkai Buster] no buffs / 20%):
- After defeating her, get the 16F relay point and go back to Gensokyo
Dark Stratum (16F ~ 18F)
Explore 16F
- When you’re back on Gensokyo, use these facilities:
- Human Village:
- Swap Cirno -> Rumia
- Human Village:
- Enter the dungeon (16F)
- From this point on, use Aya + Instant Attack to flee
- When you reach the 17F relay point, keep going
Explore 17F (Part 1)
- Enter the dungeon (17F)
- Leave after getting the treasure on northern end
- When you fall down to 16F, get the relay point and go back to Gensokyo
Goddess of Fertility Fight
- When you’re back on Gensokyo, use these facilities:
- Nitori Shop:
- Sell 1x Star of the Just (5)
- Sell 1x Wash Basin Set (5)
- Human Village:
- Swap Rumia -> Iku
- Swap Suwako -> Yukari
- Magic Library:
- Reset Kourin
- Reincarnate Parsee
- Reset Satori / Iku
- Nitori learns Warrior subclass
- Nitori: Use all money on ATK
- Hakurei Shrine: Level All Characters
- Nitori(ATK)
- Use Fighting gems on Nitori
- Use Tome of Insight - Attack on Nitori
- Nitori Shop:
- Open the menu and take the following actions:
- Form Change: Aya / Sanae / Iku / Yukari
- Equipment:
- Aya:
- (1) Meteor Drive (5)
- Yukari:
- (M) Cypress Stick (1)
- Parsee:
- (M) Training Egg (2)
- (1, 2, 3) Remove
- Nitori:
- (1) Cinderforge Sword / Glaive of Pain (5)
- (2) Glaive of Pain (4)
- Aya:
- Learn Skills:
- Iku: Thundercloud Stickleback 1 -> 5 / Supple Hagoromo 0 -> 2 / Lightning Fish 0 -> 1
- Yukari: Yukari’s Spiriting Away 1 -> 5 / Manipulation of Boundaries 0 -> 2 / MP Boost 0 -> 5
- Satori: MP Boost 0 -> 5 / Trauma Recollection 0 -> 2 / Small MP Recovery 0 -> 1 / Spell Card Recollection 0 -> 1
- Kourin: Shopowner 0 -> 10 / Shopkeeper 0 -> 10
- Parsee: Motivated Heart 0 -> 2
- Nitori: Maintenance 0 -> 1 / Overheating 0 -> 1 / Mind Body as One 0 -> 2 / ATK Boost 0 -> 5
- Before entering the dungeon, revisit the shrine:
- Hakurei Shrine: Delevel characters
- Level unification 1
- Level Nitori / Aya / Iku
- Hakurei Shrine: Delevel characters
- Enter the dungeon (16F Center) and go fight the boss
- Boss Fight - Goddess of Fertility (Lv72)
- Phase 1 - Victory
- DGA Yukari at start
- If Iku gets a turn, EDP for DEF debuff
- Yukari’s Spiriting Away
- Swap Yukari with Nitori
- Miracle Fruit Nitori
- Swap Sanae with Momiji
- Herb of Awakening Nitori
- Swap Momiji with Satori
- Super Scope
- Thundercloud Stickleback Nitori
- DGA Nitori
- Super Scope
- For finer details see Goddess of Fertility’s Boss Info
- Phase 1 - Victory
- Go back to Gensokyo to heal after the fight
Explore 17F (Part 2)
- Before you do any menuing, do the following action:
- Equipment:
- Kourin:
- (M, 1, 2, 3) Remove
- Kourin:
- Equipment:
- When you’re back on Gensokyo, use these facilities:
- Human Village:
- Swap Kourin -> Rumia
- Human Village:
- Enter the dungeon (17F)
- When you reach the 18F relay, keep exploring!
Explore 18F
- No need to re-enter the dungeon, just keep exploring:
- When you get the relay point, go back to Gensokyo
Golden Orbs Fight
- When you’re back on Gensokyo, use these facilities:
- Hakurei Shrine: Level All Characters, apply bonus
- Nitori(ATK)
- Use Training Manual xALL on Nitori
- Use Magic Gem x1 on Satori
- Magic Library:
- Reset Suwako
- Satori learns Magician subclass
- Suwako learns Herbalist subclass
- Nitori: Use all money on ATK
- Human Village:
- Swap Yuuka -> Suwako
- Swap Rumia -> Yuyuko
- Hakurei Shrine: Level All Characters, apply bonus
- Open the menu and take the following actions:
- Form Change: Yuyuko / Aya / Satori / Yukari
- Equipment:
- Iku:
- (M) Remove
- Aya:
- (M) Purple Orb (1)
- Satori:
- (M) Purple Orb (1)
- (1) The Arch (4)
- Suwako:
- (M) Chario Boots (2)
- (3) Full Custom (2)
- (2) Wallbreaker Armband (5)
- (1) Wallbreaker Armband (5)
- Nitori:
- (3) Water Cutting Sword (4)
- Iku:
- Learn Skills:
- Yuyuko: MP Boost 0 -> 2
- Satori: Magic Transfer 0 -> 2
- Suwako: Froggy Power 0 -> 2 / Placebo Effect 0 -> 5 / Herb of Awakening 0 -> 5 / MP Boost 0 -> 4
- Nitori: Cooling Down 0 -> 1 / Fast Attack 0 -> 2
- Enter the dungeon (18F North)
- Boss Fight - Golden Orb Trio (Lv76)
- Phase 1 - DTH Reverse Time
- If Yuyuko or Satori start with full ATB:
- DGA non-full ATB one / Waste Aya turn
- Saigyouji Flawless Nirvana
- DTH proc: goto Setup 3
- Otherwise:
- DGA Satori
- Yukari’s Spiriting Away
- Saigyouji Flawless Nirvana
- DTH proc: goto Setup 1
- DGA Yuyuko
- Saigyouji Flawless Nirvana
- KILL: goto Setup 2
- Retry
- If Yuyuko or Satori start with full ATB:
- Phase 2 - Team Setup 1
- Swap Satori -> Momiji
- Swap Yuyuko -> Nitori
- Yukari’s Spiriting Away
- Swap Yukari -> Iku
- Waste Aya turn
- Herb of Awakening Nitori
- Phase 2 - Team Setup 2
- Yukari’s Spiriting Away
- Swap Yukari -> Momiji
- Swap Yuyuko -> Nitori
- Swap Satori -> Iku
- Herb of Awakening Nitori
- Phase 2 - Team Setup 3
- Yukari’s Spiriting Away
- Swap Satori -> Momiji
- Swap Yuyuko -> Nitori
- Herb of Awakening Nitori
- Swap Yukari -> Iku
- Phase 3 - Victory
- Swap Momiji -> Satori
- Thundercloud Stickleback Nitori
- Super Scope Forward Time
- DGA Nitori
- Super Scope Forward Time
- Magic Transfer
- Thundercloud Stickleback Nitori
- DGA Nitori
- Concentrate
- Swap Iku -> Suwako
- Waste Satori turn
- Concentrate / Waste Aya turn (6 MP needed)
- Herb of Awakening Nitori
- Extending Arm
- Waste Satori turn
- DGA Nitori
- Extending Arm
- For finer details see Golden Orb Trio’s Boss Info
- Phase 1 - DTH Reverse Time
- Go back to Gensokyo to heal after the fight
Heaven Stratum (19F ~ 20F)
Explore 19F North / 20F West
- When you’re back on Gensokyo, use these facilities:
- Human Village:
- Swap Yuyuko -> Rumia
- Human Village:
- And then, open the menu and take the following actions:
- Form Change: Komachi / Aya / Satori / Yukari
- Equipment:
- Aya:
- (M) Tin Watering Can (1)
- Aya:
- Enter the dungeon (19F)
- When you reach 20F, follow the path:
- When you reach the destination on 20F, go back to Gensokyo
Explore 19F South / 20F East
- Enter the dungeon (19F)
- When you reach the second green orb, go back and re-enter dungeon
- When you reach the destination on 20F, go back to Gensokyo
High Magatama Fight
- When you’re back on Gensokyo, use these facilities:
- Human Village:
- Swap Rumia -> Reisen
- Magic Library:
- Reincarnate Kourin / Nitori
- Reset Parsee / Aya / Reisen
- Reincarnate Sanae / Iku
- Parsee learns Gambler subclass
- Aya learns Strategist subclass
- Reisen learns Herbalist subclass
- Parsee: Use all money on ATK
- Hakurei Shrine: Level All Characters
- Parsee(ATK)
- Use Training Manual xALL on Parsee
- Use Magic Gems xALL on Parsee
- Use Fighting Gems xALL on Parsee
- Delevel Keine, Nitori, Suwako
- Human Village:
- Open the menu and take the following actions:
- Form Change: Satori / Iku / Aya / Yukari
- Equipment:
- Nitori:
- (1, 2) Remove
- Suwako:
- (M) Training Egg (2)
- Parsee:
- (M) Strange Meat Pie (2)
- (1) Grand Master Breaker (5)
- (2) Cinderforge Sword / Glaive of Pain (5)
- (3) Glaive of Pain (4)
- Nitori:
- Learn Skills:
- Iku: Supple Hagoromo 0 -> 2 / Lightning Fish 0 -> 1 / Thundercloud Stickleback 1 -> 5 / Elekiter Palace 1 -> 3
- Aya: Gensokyo Fastest 0 -> 2 / Tengu Wind 0 -> 2 / Inspirational Plan 0 -> 1 / Furious Scheme 0 -> 10
- Reisen: SPD Boost 0 -> 5 / Intense Vertigo 0 -> 1 / Herb of Awakening 0 -> 5 / Placebo Effect 0 -> 5
- Parsee: Final Blow 0 -> 2 / Flames of Jealousy 0 -> 2 / Grudge Returning 1 -> 5 / High Stakes 0 -> 2 / All Nothing 0 -> 1 / MP Boost 0 -> MAX
- Enter the dungeon (20F East)
- Boss Fight - Magatama of the High God (Lv88)
- Phase 1 - Victory
- DGA Satori
- Yukari’s Spiriting Away
- Elekiter Dragon Palace
- Swap Satori -> Parsee
- Yukari’s Spiriting Away
- Swap Yukari -> Momiji
- Thundercloud Stickleback
- Swap Iku -> Reisen
- Herb of Awakening
- Swap Momiji -> Satori
- Placebo Effect
- Grudge Returning
- DGA Parsee
- Grudge Returning
- Magic Transfer
- Placebo Effect
- Waste Aya turn
- Herb of Awakening
- Jealousy of the Kind and Lovely
- For finer details see High Magatama’s Boss Info
- Phase 1 - Victory
- Go back to Gensokyo to heal after the fight
High Mirror Fight
- When you’re back on Gensokyo, use these facilities:
- Magic Library:
- Reincarnate Parsee
- Reset Suwako
- Suwako learns Gambler subclass
- Hakurei Shrine: Level Single Characters
- Aya(SPD) / Suwako(ATK)
- Use Training Manual xALL on Suwako
- Use Fighting Gems xALL on Suwako
- Use Tome of Insight - Speed on Aya
- Magic Library:
- Open the menu and take the following actions:
- Equipment:
- Aya:
- (M) Chariot Boots (2)
- Parsee:
- (M) Training Egg (2)
- (1, 2, 3) Remove
- Suwako:
- (M) Master’s Emblem (1)
- (1) Grand Master Breaker (5)
- (2) Cinderforge Sword / Glaive of Pain (5)
- (3) Cinderforge Sword (5)
- Aya:
- Learn Skills:
- Aya: SPD Boost 0 -> 4
- Sanae: MAG Boost 0 -> 5 / Last Wish 0 -> 2 / Miracle Fruit 1 -> 5
- Suwako: Long Arm Leg 1 -> 5 / High Stakes 0 -> 2 / Earth Creation 0 -> 2 / Froggy Power 0 -> 2 / Moriya Believer 0 -> MAX
- Equipment:
- Before entering the dungeon, revisit the library:
- Magic Library:
- Aya: SPD 0 -> 50 (Need 251)
- Suwako: Use all money on ATK
- Magic Library:
- Enter the dungeon (20F West)
- Boss Fight - Mirror of the High God (Lv87)
- Phase 1 - Victory
- DGA Satori
- Yukari’s Spiriting Away
- Elekiter Dragon Palace
- Swap Satori -> Suwako
- Yukari’s Spiriting Away
- Swap Yukari -> Momiji
- Thundercloud Stickleback
- Swap Iku -> Sanae
- Herb of Awakening
- Swap Momiji -> Satori
- Long Arm and Long Leg
- DGA Suwako
- Miracle Fruit
- Long Arm and Long Leg
- For finer details see High Mirror’s Boss Info
- Phase 1 - Victory
- Go back to Gensokyo to heal after the fight
Explore 20F Depths
- When you’re back on Gensokyo, simply re-enter the dungeon (19F)
- Break the seals up north and go into 20F Depths
- When you reach the destination, go back to Gensokyo
Ame-no-Murakumo
- When you’re back on Gensokyo, use these facilities:
- Human Village:
- Swap Reisen -> Kourin
- Swap Keine -> Cirno
- Swap Suwako -> Eirin
- Swap Komachi -> Yuuka
- Unequip non-party
- Magic Library:
- Reset Komachi / Aya / Satori / Reisen
- Reincarnate Suwako
- Reset Yuuka / Yukari
- Kourin learns Guardian subclass
- Nitori learns Guardian subclass
- Parsee learns Gambler subclass
- Aya learns Herbalist subclass
- Satori learns Monk subclass
- Eirin learns Monk subclass
- Yukari learns Strategist subclass
- Hakurei Shrine: Level All Characters, apply bonus
- Kourin - HP
- Momiji - SPD
- Cirno - SPD
- Nitori - DEF
- Parsee - ATK
- Aya - SPD
- Satori - HP
- Eirin - HP
- Sanae - MAG
- Iku - SPD
- Yuuka - HP
- Yukari - HP
- Use Training Manual xALL on Parsee
- Use HP Gems on Nitori / Kourin
- Use MP Gems x3 on Satori
- Use MP Gems on Yuuka
- Use ATK Gems on Parsee
- Use DEF Gems on Kourin / Nitori
- Use MAG Gems on Sanae
- Use SPD Gems on Kourin / Satori
- Human Village:
- Open the menu and take the following actions:
- Form Change: Eirin / Aya / Satori / Yukari
- Equipment:
- Eirin:
- (M) Repulsion Orb (1)
- Aya:
- (M) Micron’s Magic Book (2)
- Satori:
- (M) Master’s Emblem (1)
- (1) Aegis Button (2)
- (2) Intama (2)
- (3) Energy Pack (5)
- Kourin:
- (3) Megasphere (5)
- (2) Megasphere (5)
- (1) Intama (2)
- (M) Chariot Boots (2)
- Yuuka:
- (3) Intama (2)
- (2) Megasphere / Energy Pack (5)
- Parsee:
- (3) Cinderforge Sword (5)
- (2) Cinderforge Sword (5)
- (1) Holy Sword of Justice (5)
- (M) Strange Meat Pie (2)
- Iku:
- (1) Wash Basin Set (5)
- (3) Wash Basin Set (5)
- Nitori:
- (3) Divine Barrier (5)
- (2) Grand Master Breaker (5)
- (1) Intama (2)
- (M) First-Aid Kit (2)
- Eirin:
- Learn Skills:
- Eirin: Fast Dash 0 -> 1
- Aya: Herb of Awakening 0 -> 5 / Gensokyo Fastest 0 -> 2 / Tengu Wind 0 -> 2 / EVA Boost 0 -> 5
- Satori: MP Boost 0 -> 5 / Fast Dash 0 -> 1 / Spellcard Recollection 0 -> 1 / Small MP Recovery 0 -> 1 / Trauma Recollection 0 -> 2
- Yukari: Yukari Spiriting Away 1 -> 5 / Raid Maneuver 0 -> 1 / MP Boost 0 -> 5
- Kourin: DEF Boost 0 -> 5 / Formation Change 0 -> 2 / Absolute Defensive 0 -> 1
- Yuuka: HP/MP Boost 0 -> 5 / Extra Attack 0 -> 2 / Majesty 0 -> 2
- Sanae: Yasaka Wind 1 -> 3
- Parsee: Final Blow 0 -> 2 / Flames of Jealousy 0 -> 2 / Jealous of the Kind and Lovely 1 -> 5 / High Stakes 0 -> 2 / All or Nothing 0 -> 2
- Nitori: Absolute Defensive 0 -> 1 / Frontline Guard 0 -> 1 / Maintenance 0 -> 1 / DEF/AFF Boost 0 -> 5
- Visit the following facilities to finish:
- Nitori Shop: Sell everything
- Magic Library:
- Kourin: HP/DEF/SPD 0 -> 100
- Nitori: HP/DEF/SPD 0 -> 100
- Satori: HP/SPD 50 -> 100
- Yuuka: HP/SPD 50 -> 100 / DEF 0 -> 100
- Parsee: SPD 0 -> 50 (Need 156)
- Parsee: Spend all money on ATK
- Enter the dungeon (20F Depths)
- Boss Fight - Ame-no-Murakumo (Lv100)
- Thresholds (7-N / 7-Y or 10-N / 10-Y):
- No buffs -> 4.104M / 3.644M / 3.272M (WITH debuff)
- 30% buff -> 2.316M / 2.103M / 1.923M (WITH debuff)
- 50% buff -> 1.765M / 1.612M / 1.481M (WITH debuff)
- 80% buff -> 1.274M / 1.168M / 1.076M (WITH debuff)
- 80% buff -> 1.953M / 1.739M / 1.563M (NO debuff)
- Phase 1 - Setup
- Eirin or Satori need to start with 10k ATB (52% each - 76.96%)
- Aya DGA Eirin or Satori (skips if both at 10k already)
- Astronomical Entombing (must proc - 80%)
- Yukari’s Spiriting Away
- Swap Eirin -> Parsee
- Swap Satori -> Yuuka
- Yukari’s Spiriting Away
- Midnight Anathema Ritual (must proc - 46%)
- Swap Yukari -> Satori
- Beauty of Nature
- DGA Yuuka
- Beauty of Nature
- Beauty of Nature
- Swap Parsee -> Cirno
- Phase 2 - TRR Stack
- Yuuka and Satori do BoN spam
- Nitori swaps Yuuka with Momiji into Yuuka
- Kourin swaps Satori with Sanae and back
- Improvise if anyone dies
- Phase 3 - Jealousy
- TRR reaches threshold
- Absolutely need Trauma Recollection, HoA and buff on Parsee
- Put Parsee in slot 4 and get Sanae to buff her
- Sacrificing Sanae is a good option
- Iku MUST debuff boss
- She can also buff Parsee, in an emergency
- If needed, sacrifice characters until Parsee nukes
- For finer details see Ame-no-Murakumo’s Boss Info
- Thresholds (7-N / 7-Y or 10-N / 10-Y):
- GG !!!